Pages

Friday, July 24, 2015

DIY Dining Table Centerpiece


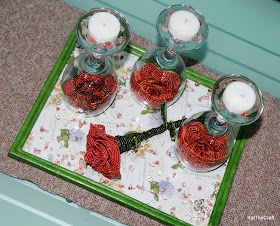
One thing that I don't like in our house is our dining table, I don't know why we got it in the first place. It looks so bulky and the glass top has an ugly pattern, we tried a table cloth before but it just didn't work for us. I crocheted a table runner to at least cover a part of it but there was still something missing, a centerpiece. I would prefer a vase with fresh flowers but I need to have a garden to afford that so I just have to settle on an alternative, fake flowers, also, instead of a vase, I used wine glasses.


Last month, I made an entry on How to Make Beaded Flowers and mentioned that it's gonna be a part of another project, this is the project I was talking about. Silk flowers would be a great choice for this, too.


The other supplies needed, as mentioned above, wine glasses, I used three, tea lights, removed from the tin, and a tray. This tray is from a repurposed picture frame, I made this the same way I made this DIY Vanity Tray, minus the feet and the beads, it's simple and fun to make, feel free to check it out.


Assembling the pieces is very easy, place the wine glasses upside down on the tray and put a flower, without the stem, inside each glass, if the flowers are smaller, two or more would be fine, then place the tea lights on top of the upside down glasses. There is really no need to glue anything in place, that way you can rearrange them, replace or remove some things. That one flower with the stem is just something I added, I only tried it and I think it's working there so I made it a part of the centerpiece. Arrange or position the glasses according to your liking and you're done.


These are cherry quartz that I scattered on the tray and around the tea lights for added effect. You can skip this one if you think it's a bit over the top.


So, that's my dining table centerpiece that I so adore, haha. I don't notice the pattern on the table top so much now and the table doesn't look boring anymore. It's very simple and easy to make, the beaded flowers are the only ones that took a while to make but you can always replace that with silk ones or probably a different item other than flowers.

By the way, that brown table runner took me two weeks to finish, am I patient or what? Bye for now, lots of things to do!


Saturday, July 18, 2015

Ball Mason Jars For Your DIY and Crafting Needs


If you are into food canning, you surely know about Mason jars but even if you're not and you're into DIY and crafts instead, you're also probably familiar with these lovely and useful jars as their use evolved from food preserving to home and party decor, storage, and gift ideas. A quick online search will give you hundreds of results for Mason jar crafts. 

This Mason jar craze, of course, also reached Manila a few years ago and everyone was on the lookout for suppliers selling these jars. One of the most popular brands is Ball and I've seen online shops here sell them before for as much as Php 200 (about $4.50) but since we can find more of these from a lot of sources now, the prices became more and more reasonable. There are even Mason jars available now in Divisoria and you can check out Ang Istorya ng Divisoria's post about this, there may be some real stuff there and of course imitations for cheaper prices. For food preserving purposes, you're safer with a legit Ball Mason jar as it is of good quality and is food-grade, but for other projects that don't involve food you're probably good with a cheaper version.


This is what I found yesterday, Ball Mason Jars on sale at Ace Hardware! Okay, so I honestly don't have any idea that Ball Mason Jars are available there so imagine how excited I got finding them at 50% off. They're sold in bulk and come in boxes of 12 and I just paid Php 499.87 for a box or a little over Php 41 apiece (about $1). I was at Ace Hardware V-Mall and the store personnel told me that the jars are also available and half-price in other branches as they're having an All American Brands Sale for the whole month of July. I didn't really look for the other items on sale as I don't need anything else at the moment but you can drop by their branches to check, some brands I've seen that are on sale are 3M, GE Lighting, Rubbermaid, Coleman, and Energizer.


Anyway, I just want to share this good news to Mason jar fans, this is a good time to hoard, right?. I was planning to buy two boxes but I think a dozen is good enough for now, I already have my fix for the whole year.

Well, gotta go and start playing with these jars. Bye!


Sunday, July 12, 2015

A Welcome Home Banner for My Beautiful Niece

DIY Welcome Home Banner
My niece, Chachi, was diagnosed with Ventricular Septal Defect (VSD) or "a hole in the heart" when she was still a baby. You may know that in some cases, those with small VSDs, the holes close on their own but unfortunately my niece needed an open-heart surgery, which she had just recently. During the ten days that she was in the hospital, everyone in the family kept on visiting and bringing her gifts and those abroad did Facetime to keep her happy as she was so bored and wanted to go home so bad. We're all thankful and happy that the surgery went well and that she's finally home and recovering fast. My mother who was responsible for almost all of the hospital expenses with the help of my stepdad and their relatives thought that it would also be nice to have a "Welcome Home" party for Chachi so we did have one. A little effort to make the banner myself is one way to show my niece how much I love her.

This banner is great for birthdays, baby showers, or any kind of party or occasion. To make one like this, you need:


Colored or printed paper (2 sets of different colors, I used letter sized ones.)
Scissors or cutter
Ruler
White glue or glue stick
Masking tape
Paper twine (you can also use a ribbon or any kind of rope)


With your 2 different printed or colored sets of paper, choose which one you would use for the letters and which one for the background. I chose the pink one for my letters and printed out two letters on each page. Do the same on the paper you chose for your letters.


Cut out the letters using your scissors or craft knife. The height of my cut out letters is 3 and 1/4 inches.


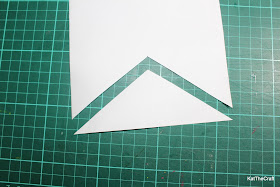
Based on the size of your letters, cut out the flags where you will be adhering them. I chose between the swallowtail and the triangle flag for the letter's background and went with the former.


Since I printed out two letters on one page, one letter fits on one half of the paper, so I cut the sheets of paper in half for the flags.


To make the swallowtail flag, find the center of the bottom side and measure how deep you want the v-shape to be and mark it. I decided on 2 inches.


Using a ruler, draw a line from that 2-inch mark to each of the corners at the bottom to form the v-shape and cut along the lines. If you are using a cutter or a craft knife you can just directly cut from the mark to the corners with the help of the ruler without drawing a line. 

You can now use the first flag you made as a template for the other flags.


Adhere the letters on the flags using white glue or gluestick.


String the flags by folding or wrapping a small part around the paper twine or rope and tape it to secure. Another way is to punch holes on the top part of the flags and string the rope through them. Make sure to leave a few inches of rope before the first flag and after the last one, just enough space where you can tape the banner to the wall. After making sure that all the letters are in order, you're done.


That's our Chachi looking well and happy. I'm so glad that she loved the banner, though I think she enjoyed the heart balloons more, haha.

There are lots of styles and materials you can use to make your own banner - scrapbook paper, glitters, colorful printables, ribbons, tassels, and a lot more. Whatever you choose, remember to have fun while making your little project.

Thank you for stopping by. Till next time!