Friday, May 22, 2015

Christmas in May! My Jewelry Making Supplies Just Arrived

I'm so happy with what I got from my mom's package recently. Well, I'm always happy with whatever I receive, of course, but this package is extra special because it has my jewelry making stuff. What my mom has sent us from the US was actually double of what I have with me right now but my sister suddenly decided that she wants to try jewelry making, too, so we divided everything in half. Anyway, this would still keep me busy for a long time.


I already have some of these tools but I only got them locally for cheap prices and I'm happy to get new ones with better quality. These are curved chain-nose pliers, crimping pliers, flush cutter, stringing wire nipper, flat-nose pliers, round-nose pliers, wire wrapping pliers, nylon-jaw pliers, and wire rounder. 


I've been wanting to try Kumihimo for a long time but I don't know any place that sells Kumihimo discs here in Manila or even online craft stores. Now, I can finally make a bracelet with this technique. I asked my mom to get the disc and the pack of embroidery floss from Amazon. The Kumihimo disc, I think, is about $5 and the embroidery floss is only $15 for 105 skeins which is less than half the price of the DMC floss I usually buy here.


I also got these sticker labels, bead mat, and beading tray. There was another beading tray for necklace that went to my sister.


I love this wire lot. There are sterling silver wires, gold filled wires, and copper wires of different colors and sizes. 


Jewelry making supplies wouldn't be complete without the different kinds of findings, of course. 


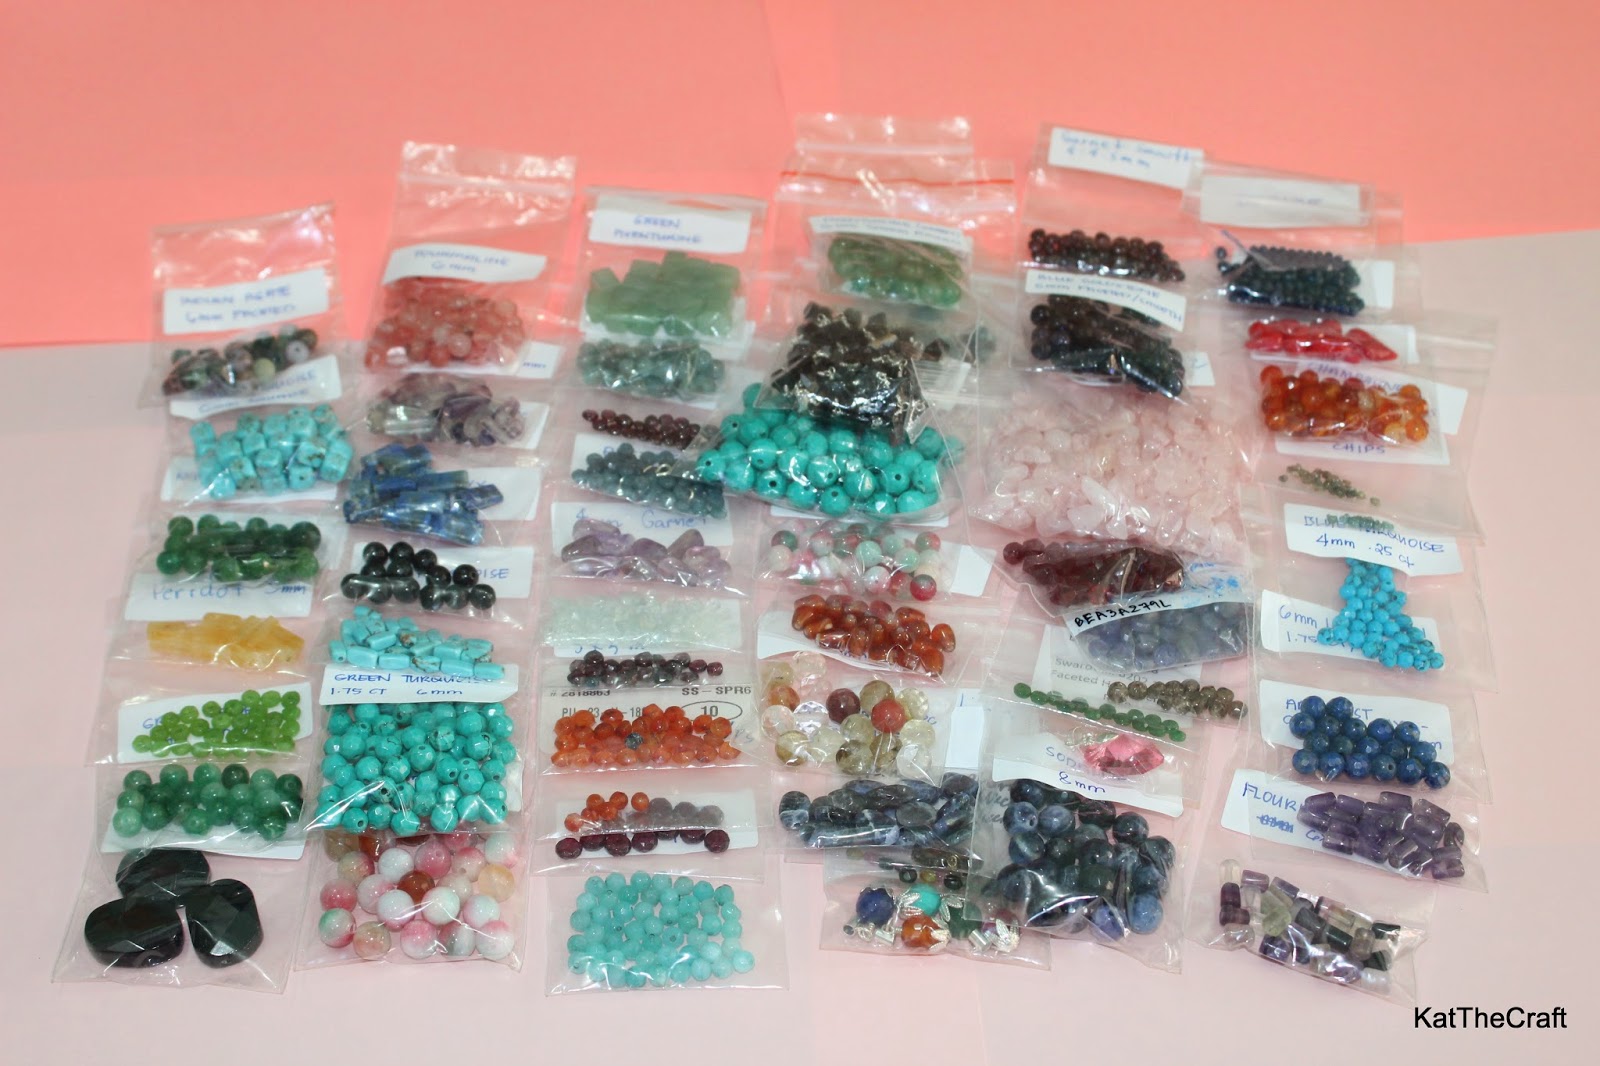
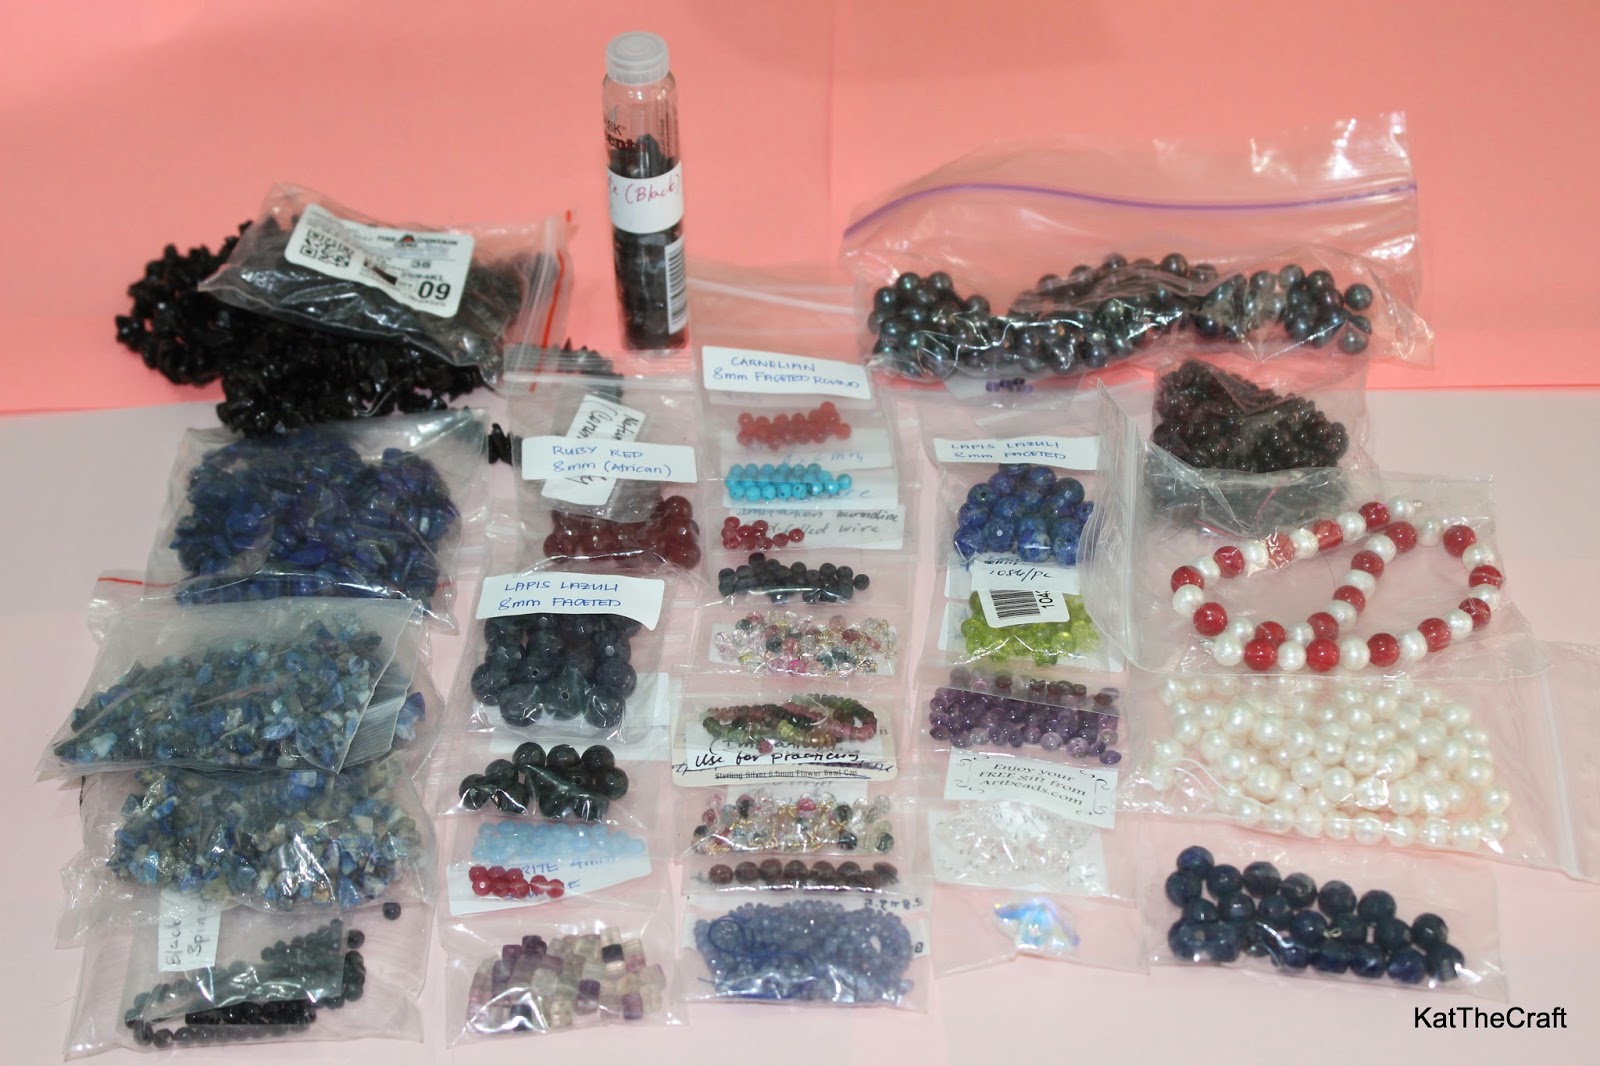
And this is the big part of the supplies we got, it took us a while to divide everything in half, for my sister and me. Beads, gems, pearls, and precious stones that I'm excited to work with. I don't really wear jewelry much but I love making them.


Of course, the ever reliable E6000 glue. I got mine before from Deovir but I forgot how much I got it for, probably just a little bit more than the cost of this one because Deovir's prices are very reasonable even for imported items.


This one is my favorite, a digital pocket weighing scale. I don't really need it but I'm happy to have one. I actually already weighed some of my jewelry, haha.

Well, this is the end of my loot. Thanks to my mom for all of this. I wanted to share where each one are from but my mom got them from different shops, I'm not sure which ones are from where but checking those with labels, they're from Firemountaingems.com, Jewelrysupply.com, Beadalon.com, Beadaholique.comArtbeads.com, and Artisticwire.com.

Thank you so much for reading. I just wanted to share a peek of what my next projects will be and also my happiness, haha. Yes, like any other ladies, I love shoes, bags, and clothes, but what excites me more is anything for my arts and crafts.


Read More »

Thursday, May 21, 2015

DIY Wall Organizer - Mail Storage, Reminder Board, and Key Holder


If you're like me who's still struggling to declutter the house and organize small stuff, this project might give you an idea for an organizing solution and at the same time utilize your idle wall space. This is just a simple wall organizer for your notes or reminders, mail, and keys. Before making this, our mail, usually billing statements, and keys are just on top of our fridge. It's a good thing that most of our bills are now sent through email or they could pile up really high. 

The design ideas on this kind of project are endless. Different materials can be used for this, like wood or fabric for a hanging organizer, or a dry erase board or chalkboard for the notes, or even a corkboard. As usual, I chose to use what I have that's readily available to me. A lot of the things listed below are actually optional if you're going to make your own, like what I said, different materials can be used but for this particular wall organizer I made, I used the following:

- Illustration board
- Colored paper, wrapping paper
- Glue
-  Mod Podge (gloss finish)
- Watercolor
- Adhesive hooks
- Scissors
- Craft knife
- Mounting tape


First thing I did was to decide what size I want my project to be. I checked out the wall where I'll mount it and based the size on it. With just enough room for the notes, mail storage and key holders, I cut the board with my final measurement which was 20 inches by 12 inches. I cut two compartments for my notes, for the "to do list" and the "to buy list", and one for the mail storage.


The size of the frame is 7 inches by 5 inches. On the outer side of the frame for my notes compartment, I glued some cardboard about half a centimeter wide and about that thick too so when the frame's glued on the board I'll have enough space where I can insert a sheet of paper or more where I'll be writing my notes on. Yes, that's the design I'm aiming for, anyway, there will be a picture later to better explain it. 


The mail storage is not too big so I'll be forced to throw away unnecessary mail and just store the recent and important ones. It's 4 inches by 9 inches and the opening is 1 inch.


I wrapped the pieces with my chosen wrapping paper, just a simple brown background with different clocks print. 


I cut small pieces of colored paper, the label says that it's cyber green, and adhere them to the board using Mod Podge. I want to have that mosaic-like or cracking effect that's why I cut the paper into small pieces first. 


I painted over the paper with watercolor to get the shade of green I wanted, something that would go better with brown. I'm not sure if I've achieved it but it's not really a big deal, haha. 


And of course, I finished off with Mod Podge. 


I got this set of 3 adhesive hooks for only Php 45 ($1) and I think it's perfect for this project. 


After sticking the adhesive hooks on the board, I then glued the mail and notes compartments.


Of course, I wouldn't forget about the labels. I used watercolor to write on the colored paper to make the labels and applied a thin coat of Mod Podge for a glossy finish.


This is what I meant earlier about leaving a space where I can put in paper for my notes, this way, I can also recycle used paper as long as one side is clean. It's actually useful specially for my to buy list, I could just take the paper with me when it's time to go shopping.


Then, it's time to mount the finished project. I used this heavy duty mounting tape along the sides of the back of the board and put little pieces of double sided foam tape in the middle. I'm not planning on hanging other things on the hooks except for keys so I think I was just being OC putting lots of mounting tape. Yeah, I'm like that sometimes. 


Anyway, here it is. I love how it turned out and I'm happy to say that the top of our fridge is now almost clutter free. Yup, almost, but not a big deal really, there are just some things that we're so used to putting on top of the fridge after using, like my husband's box of cigarettes, lighter, and hand sanitizer, which I'm okay with as long as everything is placed neatly.

I would love to hear other organizing or storage solution ideas from you. We all want to have a tidy house, right? There's always something to be done, might as well have fun doing it, and DIY stuff is always fun. 

Ta ta for now!


Read More »

Wednesday, May 20, 2015

DIY Cardboard Vase and Tissue Paper Flowers


Hi there! This is another post about a DIY project I made, a cardboard vase and a bunch of tissue paper flowers, an easy project for anyone to make, so feel free to check out how it's done.

The wall art featuring paper orchids I made a while ago inspired me to do this new project. When I was looking for paper flower patterns for that wall art, I saw some pictures of pretty flower bouquets made from different kinds of paper. The tissue paper flowers are the ones I like most because the flowers look soft and delicate. I don't have the type of tissue paper used in gift wrapping in my craft supplies stash, so I decided to make my own version of flowers using bathroom tissue, yes, that's right, just the regular bathroom tissue.

Before making the bouquet of flowers, I made a vase where I can put it in first. We do have a vase ready but it's transparent which won't do because I don't think the paper stems would look attractive.


I used illustration board to make the vase. I cut 10 pieces of 5 inches by 5 inches board, 2 pieces for each side because I wanted them thick and sturdy. I glued 2 squares together on their wrong side, the black side, then I assembled the box type vase with the use of white glue. After letting it dry, I cut off uneven edges with a craft knife.


I have this colored paper that's perfect for decoupaging and I chose the canary yellow one, cut it to small pieces, because I want to have that mosaic effect, and adhere them to the box using Mod Podge. 


I mixed up a few watercolor shades to get the color I want, just golden yellow, and painted over the colored paper.


This one is unusual, I don't know what I was thinking, haha. I wanted to give it a little luster and I think that mica powder or pearl ex pigments would be great for this but I didn't have any so I tried using my bronzer instead.  I applied the bronzer on the lower part using a makeup brush. I was afraid it wouldn't stay like it does on the skin but it did so I was happy with it. I'll just make sure to include mica powder on my things to buy list.


A thin coat of Gloss Mod Podge gave it the look I wanted. Then, it's time to make the flowers.


For the stems, I just cut used copy paper into strips , rolled, and glued them to stay rolled up.


Each flower is made from 5 sheets or panels long of bathroom tissue, ours is 2-ply so the flowers are a bit fluffy looking which is good. I folded the length of the tissue horizontally, rolled around the tip of the stem, and taped it after each round or less so it wouldn't unravel. 


I kept making more blooms until there's enough to form a lovely bouquet. I gathered the stems into a bouquet, wrapped them with masking tape, and trimmed the stem ends. 


I put the bouquet in the vase, doing some little tweaks here and there, removing and adding flowers in some areas, and it's done. I wanted to spray some color like light pink or blue but  I'm afraid it might just ruin the flowers since they're made of bathroom tissue. I tried it on one flower first, it didn't soak the flower but I didn't like the result either, there were like drops of water color, maybe because the sprayer I used sprays out not so fine mists. So I just left my bouquet as it is, pure white.

You can use different materials to make your flowers like crepe paper, gift packaging tissue paper, fabric, and many more. They're simple and easy, all you need are just a few supplies, a bit of your time, and your crafty hands.

Now this is one bouquet that will last for a long time. Have a nice day!


Read More »

Thursday, May 14, 2015

DIY Decorative Candle Tray Set


This blog post is about making this little decorative piece. There are lots of beautiful candle trays available out there but being the DIY enthusiast that I am, again, I just decided to make one myself. I have this beaded wire tree (see these posts to see the making of the tree and the base) that I wanted to feature in this project along with the candles, of course.


I started off with the tray first. I cut pieces of illustration boards into the sizes needed for the tray, times two, as I wanted to double the thickness of each side. I then glued the same two pieces of board to each other before I assembled the tray. I only used regular white glue on this.


When the glue dried and the tray was already sturdy, I covered the sides of the tray with thin white clay. I want to give it a clay like finish so the cardboard wouldn't be too obvious. This is the air dry type of clay so there's no need for baking.


After a couple of hours the clay was completely dry since it was only a thin layer but I still waited a little longer just to be sure, I was doing other things while it was drying. anyway. Then when it's ready to be painted over, I just used watercolor and my fingers to paint. I wanted an uneven effect so I tried to see if finger painting would give a better result than using brush. I'm quite happy with the it so I just left it like that and finished off with a thin coat of Mod Podge.


I wanted to use the scented candles that I have in the bathroom but I thought that I'm not really planning on lighting this set that I'm trying to make, just purely for display purposes, so I chose these plain white candles and dressed them up a bit. 


From the two candles, I cut four pieces with different sizes using a heated cutter, so the hot blade just slid through the candle.


This tissue paper is something that I just got from a bag I recently bought. The sales staff forgot to remove the filler or it's probably not required to remove it before putting the bag in the paper bag. Instead of throwing it away, I kept the tissue paper thinking that I could use it in one of my recycling projects, and I was right, haha. I smoothed it out, cut it to pieces with sizes just right for the candles, and painted them with watercolor. This tissue paper can be printed on using a regular printer, just stick it on a regular copy paper, with a little adhesive on the corners maybe, just enough for the tissue paper to go with the copy paper when you feed them on the printer. This way, you can print a picture on it or any other design for a more personalized touch.


I wrapped the tissue paper around the candle with the painted side facing it. Pressing the back of the heated spoon lightly on the tissue paper made the candle wax melt and soak through the paper. Now the paper is like a part of the candle. An electric iron or a hairdryer can be used in this process, too, or probably anything that can do the same, melting the wax but not burning the paper.


When the tray was ready, I just glued the candles and the beaded wire tree on it using white glue and let it dry.


I scattered pebbles and beads evenly on the tray around the candles and the tree, and coated them with Mod Podge to add some gloss. 


It's finished and is now one of the decorative pieces on our console cabinet. The letter standees and the vase of flowers are also just made by me, haha. Just a proof that I'm really into DIY.

If you're feeling creative today, go ahead and grab something to make. You'll be surprised how fulfilling it is to see your finished project, even if there are some things that didn't turn out as planned. Just a warning though, once you start making crafty stuff, you'll get hooked to it. 

Hope you like this post. Ciao!


Read More »

LinkWithin

Related Posts Plugin for WordPress, Blogger...