Tuesday, June 30, 2015

Repurposed Picture Frame - DIY Vanity Tray


A vanity tray is commonly used to hold perfume bottles, thus, it's also called perfume tray, but of course, you can use it for other things like your hair brush, make up, or just about anything else that you have to please your vain side. That's also why it's a must have for me but what I like most about having one is it serves as a place where I can temporarily put my watch and jewelry pieces when I feel too lazy and tired to open a jewelry box or watch organizer and put things on the right spot. 

I used to have this acrylic tray from a box of chocolate as my vanity tray, it's perfect for its purpose but I still wanted to replace it when I get to buy or make one. I couldn't find a tray that I like in the stores here or maybe I didn't look hard enough because in the back of my head I want to make it myself. Then, my sister gave me two 8R sized picture frames which she had for a long time but didn't use and she said that I might be able to do something with them as the frames are ugly, but they're not bad for their price, just Php 50 apiece (a little over 1$). And so, it hit me right away that I'm going to make a vanity tray from one of the picture frames. A quick online search told me that this is already a very popular DIY project, picture frames turned into vanity, serving, coffee table, and other kinds of trays. The frames mostly used for vanity trays are the ornate ones since they're already decorative, unfortunately, what I have needs a bit of work for it to at least look pretty.

There are lots of tutorials out there about this project, with different takes and styles that you can check out, and here is what I did to make my own version.


This is the frame I have, it's a kind of plastic and I also don't like black for this tray so I had to cover it.


The frame hangers at the back are already rusty so I just removed them using pliers.


As I didn't purchase any material for this project like spray paint or whatever I can use to paint over this black plastic frame, I just covered it up first with tissue paper, I did two layers, using Mod Podge so I can use watercolor on it.


I mixed a few colors to get coral, I think it got a bit darker but I still like it. After I finished painting the whole frame, I applied a moderate coat of Mod Podge and let it dry.


I measured and cut the size of the scrapbook paper I needed to put beneath the glass. It still look a bit plain to me even with the new color and the scrapbook paper with light pink patterns so I just added some bead details. I strung beads into a thread so I wouldn't need to glue them one at a time.


I glued the string of beads one side at a time using white glue and pulled off the string when the beads are already in place.


I used generous amount of glue to make sure that the beads are not going anywhere and it dried off perfectly with all the beads intact.


This is already good as it is but I still wanted to add a small detail, little feet using wooden beads.


I painted the wooden beads with the same color I used on the frame and finished off with a coat of Mod Podge, too. I attached a bead to each corner of the frame using E-6000 and let it dry overnight, just to be sure.


And here it is, my very own vanity tray from a picture frame. Simple and easy, isn't it? The best thing about this project is you can customize it, you can use a picture, fabric, glitters, or just anything you can think of to place beneath the glass, or you can remove the back completely and just leave the glass for a different look. When it comes to the frame, you can spray paint it, add distress, decoupage, or leave it as it is if you're happy with the frame you have. 

As you can tell, this is a very affordable project though I couldn't say how much it cost since I already have all the supplies I needed but even if you still have to buy your materials, it would still definitely cost less than a store bought vanity tray, and with the fun and satisfaction of having to DIY.


Read More »

Tuesday, June 23, 2015

How To Make Beaded Flowers


This set of beaded flowers is a part of a bigger project that I'm making. I did this first because it's the part that's a bit longer to finish. It's easy to make but I can't say that it's quick, I think it took me about 2 hours to finish just one flower, but maybe it's just me, because I always watch movies or TV shows when doing craft projects, so I'm not so focused.

This is commonly called French Beaded Flowers which from what I gathered is the name of the technique used which is threading beads into the wire and wrapping the beaded wire around a foundation row or frame to form the petals. The flowers you can make can be used as a home decor, which is what I'm making this project for, an accessory, a jewelry design, or a beautiful bouquet, I've actually seen pictures of bridal bouquets made with beads. So if you think this is a project worth your time, check out how I made these beaded flowers.

These are the things needed:

Wire (I used a 24 gauge wire but I think 26 gauge is better, only I don't have enough 26 so I used 24 instead.)
Seed beads
Wire cutter
Chain nose or round nose pliers
Floral tape (optional)


I still didn't have an idea how much wire I would be needing so I just cut about 16 inches as a start, then twisted and formed the wire into the foundation frame as shown in the picture above. I now have something like a deformed letter Y with one short tail and a very long one. I just also winged that part basing on the size of the petal I was planning to make, so, that lower part with two strands twisted together, which is going to be the stem is about 3 inches long and that shorter tail is about 1.5 inches.


I started with a row of beads in the center, which is the base where the beaded wire will be wrapped around.


Then, I threaded beads in the long tail, pushed the beads towards the base, just enough beads to form a row on the side of the base beads, and wrap the wire on top of the base. This is where you can start to form the shape of the petal you want, if you want a rounder petal, just form a half circle string of beads, if you want a pointed petal, wrap the wire on top with the angle pointing up.


I did the same on the other side, it's now looking a bit like a petal.


I just continued adding beads and going up on one side, wrapping the wire, and going down on the other side and securing the same way, until I reached  the size I want for the petal.


Before cutting the excess wire from both ends, I secured them by giving the tails another wrap and twist.


One petal down, more to go. The number and sizes of the petals will depend on the flower you want to make. What I was making requires lots of petals with different sizes so I made several more petals of various sizes. I used a different bead color on the outer row to emphasize the edge of the petal, so each petal would still be clearly seen even when they're already grouped together to form the flower.

Another way of making petals is starting off with threading lots and lots of beads into the wire without cutting it from the spool and form the foundation frame, the one that looks like a letter Y, this way you can just go on and wrap the beaded wire around that frame, continue doing so and just cut the wire after you formed your desired petal size. I just didn't do this method since my spool of wire is so big and it's getting in the way of my work. 


This is what I said earlier about how to form the shape of the petal, the one on the right which is still in progress on the picture above started off with rounder rows compared to the finished one because I wanted this new one to be round.


And these are the petals I made for a single flower, four groups of different sizes. The smallest petals used up about 15 inches of wire, the next smallest ones, 20 inches, the next group, 27 inches, and the biggest petals, 40 inches, those measurements would leave a long enough tail of wire to work with to secure the ends.


I gave the petals a little bend here and there to add form and a bit of effect to the stiff shape.


Then it's time to assemble the flower. I started with the smallest petals, positioned them to form a small bud and twisted their stems together.


I just kept adding petals, one at a time, based on their sizes, smallest to biggest, and wrapping the stem around the other wires already wrapped together until all the petals are attached.


Some of the petals on the outer part were still a little loose so I wrapped a wire around the stems to tighten and secure the petals.


I cut the stem shorter for the flower to fit the place where I'll be putting it and wrapped it with floral tape. You can skip wrapping it with floral tape if you want a twisted wire look or you can use other materials like ribbon or paper tape.


The flower I made is actually done for its purpose but I'll just show how to make one with a longer stem, something that can be placed in a vase. 

One way, and I think, the best way is to start off with petals with longer stems, so if from the start you know that you need a flower with a long stem, make the stems of the petals' foundation frame long, not just 2 or 3 inches. 

Another way is to attach a stick or a rod to the flower, that is when, like what I have here, you made your flower using short stemmed petals. Attach the stick or rod by wrapping wire around it and the flower's stem like when you're securing a splint. As shown in the picture, I used about five or six strands of wire with thicker gauge twisted together because I don't have a rod or a stick available.

\
I also made a few leaves and attached them to the stem.


I then wrapped floral tape around the stem starting from the top, again, you can use other materials here like a ribbon or yarn.


I wanted to make the stem sparkly so I wrapped a beaded wire around it, I guess it looks cute although the stem looks thicker now.


So, all of this is just a part of another project, that means there's still work to be done. It honestly took me hours to finish but it's so worth my time and effort, I love how the flowers turned out. 

Thanks for visiting and if you have any questions or something to share about this entry, please feel free to leave a comment. Have a great day!


Read More »

Sunday, June 14, 2015

Easy DIY Magazine or File Holder


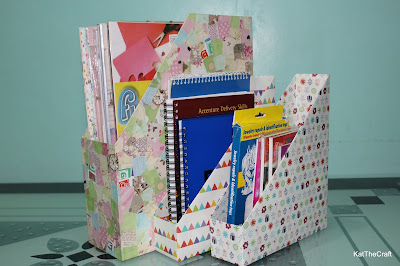
These magazine or file holders are very easy to make and are made from simple materials. The bigger one is made from illustration board and the two small ones are made from a cereal box. This project is very useful not just for organizing magazines but also for the kids' coloring books, activity books or other files.  I'm using mine for organizing paper supplies.

I'll show you how I made the magazine holder from a cereal box first. My brand of cereal doesn't have the really big boxes like the others that could fit a magazine, so it's great if your cereal boxes are big enough for magazines, this project will be easy-peasy for you. The box I have is just 7.5" x 2" x 11" and it couldn't hold my scrapbook paper stash so it's just for my notebooks, photo paper, and other smaller stuff. 


The picture above shows some options on how to cut your cereal box to make this project. Just remove the top flaps of your box, mark and line on where you should cut, and cut it using a craft knife or scissors. Then, have fun decorating, you can use wrapping paper, stickers, or washi tape.


As I've mentioned earlier, my box is a bit small and it's just for small stuff like notebooks, so this is what I did. I cut my box in half as shown in this picture so I was able to make two small holders.


First, I closed the top flaps back and secured them with glue, so that would be the bottom of one of the holders. 


I did a little measuring then mark and line the box on where to cut and used my craft knife to cut the box in half. 


Then, there are two pieces ready to be covered. I just used scrapbook paper and glue to wrap them.


And, done. My notebook and small paper supplies are now neatly organized which is better than when they're piled up on top of each other.

Now, on to my copy paper, card stock, art paper, and scrapbook paper pile. Since I don't have a cereal box big enough to hold them, I just used illustration board to make the holder instead.

I have this 20" x 30" illustration board I bought for only Php 37 (less than $1) that I was planning to use for another wall art, but I decided to use it on this project instead, I'm still waiting for some supplies to make that wall art, anyway.


I cut the board based on the paper sizes I have which are mostly A4, so before the diagonal cut out design, the sides are 9" x 12" and the width of the box is 4".


I just used a regular white glue to stick the parts together and let it dry for quite a while maybe more than an hour or two since I used a generous amount of glue to make sure that every part is secure. 


When the glue's dry and the box looks sturdy to be worked on, I decoupaged it with small pieces of scrapbook paper using Mod Podge. I have lots of these 1"x1" pieces of paper because before throwing away small cut outs from a finished project or a scrap piece of paper, I always check if there's still a big enough  piece I can save. I only throw away tiny pieces and strips that couldn't make out a one inch square. 


After adhering the squares on the box and finishing up with a coat of Mod Podge on top, my file holder is ready. I also tried putting some magazines and they fit well on this size of box.


Now, everything form the biggest size of paper to the smallest one in my craft area seems to be in order. As of this writing, I'm actually still in the process of making organizers and boxes to keep everything neat and keep attractive and colorful things from my daughter's sight. Every time she comes here in my craft area, she likes getting her hands on anything she thinks she can play with, that's why I always make sure that anything breakable and sharp is far from her reach, but sometimes I let her play with balls of yarn and choose the color she likes.

Till next time. Thanks for visiting. 


Read More »

LinkWithin

Related Posts Plugin for WordPress, Blogger...