Wednesday, September 30, 2015

Reminiscing: Our Wedding Day

Photo by: Editorial Wedding. Location: Gazebo Royale.
It's our wedding anniversary month and my husband went on a vacation leave for our week-long celebration, so happy! It's been three years, we got married on September 22, 2012, more than a year before our little princess, Jordana Kendall, arrived. We started our celebration by watching our Save the Date, Same Day Edit, and Wedding Highlights videos and laughed at ourselves.

I want to share with you our Save the Date and Same Day Edit videos from the Motion Diaries website. If you're reading this and you're planning your wedding here in the Philippines and still looking for cinematographers, you can check them out , they're really good and so fun to work with.

There are a few parts that really make me laugh, like they're unintentionally funny, or maybe it's just me, lol.  


The song in this video is Better Days by Goo Goo Dolls, I love this song, just so right for the vibe we were going for. We posted our Save the Date video on Facebook and tagged those who were invited around July and sent out formal invites a month before the wedding. Shooting this made me realize that I'm so bad at acting, we had several takes for some scenes because I couldn't stop laughing, my goodness. We shot this at Ronac Art Center, San Juan.


This is our Same Day Edit video shown at the reception. The song is I Will by Dia Frampton featuring Blake Shelton. We loved this pair during the first season of The Voice and when we got Dia's album we instantly fell in love with this song and we knew that it's gonna be played at our wedding just like we knew, from the start, that Everything by Lifehouse was going to be my bridal march.

We didn't know the priest who officiated at the wedding personally but we're so happy that it was him who did because he's so funny and he didn't rush the ceremony even if we started an hour late.

We had our wedding preps at Luxent Hotel along Timog Ave., Q.C., the ceremony was held at Our Lady of Consolation Parish, Mira Nila Homes, Q.C., and the reception at Gazebo Royale, Visayas Ave. with set up and decorations by our caterer, Hizon's Catering.

I can say that our Black and White, Rock and Roll wedding went well though there were a few minor mishaps like the bride arriving late at the church, haha, forgetting to bring my earrings to the hotel, misplacing the flower headdresses for the flower girls and not knowing until the end what happened to them, and a few others. We just laughed them off, the only thing I was really worried about that time was the fact that we're already running late, I didn't want to keep our guests waiting.

What I still couldn't get over until now is my church entrance, when the woman assigned to open the door stayed almost at the center like she's welcoming me to her home instead of disappearing behind the door. That could easily be one of the worst church door opening scenes in the wedding history, haha. You can see it at 2:20 time mark on our SDE.

Anyway, this is just a break from my usual craft and DIY project blog posts. I consider this as a part of our anniversary celebration. I hope you enjoyed our videos.

Always celebrate life. Cheers!


Read More »

Sunday, September 27, 2015

A Fun Read: J.K. Rowling's Fantastic Beasts and Where to Find Them

I'm so excited about the upcoming 2016 film "Fantastic Beasts and Where to Find Them", the first installment of a trilogy, for so many reasons - I love the world of Harry Potter, it is J.K. Rowling's screenwriting debut and I can't wait for the new adventures that she had come up with, and Academy Award winner Eddie Redmayne will be playing the role of the protagonist Newt Scamander. The movie is still being filmed and there's still no trailer or even teaser out but I can already imagine the beautiful creatures that they will be showing. 

The book of the same title written by J.K. Rowling where the film is based is presented as written by the fictional character from the wizarding world of Harry Potter, the magizoologist Newt Scamander and as a textbook listing magical creatures, their characteristics, their classification or level of dangerousness, and of course, where to find them. The movie will be about Scamander's travels and encounters with these creatures, another magical treat for HP fans.


In light of this exciting event, I decided to revisit my copy of Fantastic Beasts and Where to Find Them. I got it together with its companion Quidditch Through the Ages in a box set labeled "From the Library of Hogwarts". I bought this Hogwarts Library set from Amazon.com and had it shipped here because I couldn't find it in a bookstore anywhere here in Manila. Another box set was also released which includes The Tales of Beedle the Bard but I got this other one with only the two books included because I already have a separate copy of The Tales of Beedle the Bard.


This book, Fantastic Beasts and Where to Find them is so fun to read because it's supposed to be a duplicate of Harry Potter's own copy and several pages have writings on them by Harry, Ron, and Hermione. It says that it's already on its 52nd edition and this particular one is made available to Muggles with Potter's permission and which the author Mr. Newt Scamander has also agreed to. Twenty percent of the retail sales price less taxes of this book go to Comic Relief's Harry's Books fund to help children in need throughout the world. (This part is true *smile emoticon*)

In the book Harry Potter and the Sorcerer's Stone (Philosopher's in the UK version), Fantastic Beasts is included in the list of required textbooks for first year students at Hogwarts.


The first page looks like an exchange between Ron and Hermione. Typical Ron and Hermione, always bickering.


The contents as shown in this picture:

- About the Author
- Foreword by Albus Dumbledore -- As always, full of wisdom, it shows even on a simple Foreword Great man, Dumbledore. (in Hagrid's voice)
- Introduction by Newt Scamander
  About This Book
  What Is a Beast?
  A Brief History of Muggle Awareness of Fantastic Beasts
  Magical Beasts in Hiding
  Why Magizoology Matters
- Ministry of Magic Classifications
- An A-Z of Fantastic Beasts

The doodles are so funny, a spider chasing a stick drawing which appears to be Ron with a caption "you die Weasley", "Harry loves Moaning Myrtle", and "Chudley Cannons" written by Ron which Harry responded to with "write a decent team in my book for a change Weasley".


This page, About the Author, shows that Newt Scamander was born in 1897 and still lives with his wife in Dorset and their three pet Kneazles. This book was published in 2001 but I haven't heard any news of his passing so I guess he's still alive. Wizards live longer than muggles, don't they?


The Ministry of Magic Classifications page shows how creatures are categorized based on how dangerous they are, with one X for boring to being known wizard killer/impossible to train or domesticate with XXXXX and a note added "or anything Hagrid likes". We all know that Hagrid thinks that dragons, three-headed dogs, and Acrumantulas are harmless and good for pets. Oh, Hagrid!

The classification for Acrumantula is XXXXX as it is known to eat humans and on this page, nine more X's are added, no doubt, by Ron as spiders are his greatest fear and a monstrous one that could eat him is beyond his worst nightmare. Speaking of which, he's probably still having nightmares because of their encounter with Aragog in the Forbidden Forest (from the second book of the series, Harry Potter and the Chamber of Secrets) where he and Harry where almost eaten by Aragog's children.


Still from their experience in the Forbidden Forest with the Acromantulas, the word "unconfirmed" from the line that says "Rumours that a colony of Acromantula has been established in Scotland are unconfirmed." was crossed out and a handwritten "confirmed by Harry Potter and Ron Weasley" was added.


A lot more of these clever and cheeky notes are written through out the book which really added to its fun and entertaining tone, so very Harry and Ron.

Some of the creatures here were not even mentioned in the HP series, if I'm not mistaken, so this would be a great read for someone like me who enjoys imagining being a part of the wizarding world. Definitely a must-have for every Harry Potter fan.

So long, Muggles!


Read More »

Wednesday, September 16, 2015

Repurposed Book - DIY Book Safe

DIY Book Safe
This is a project I've been wanting to make for a long time now. I just couldn't destroy a book from my collection and I don't have any of those hardbound Reader's Digest or a volume of an obsolete encyclopedia. So, a few days ago, when my husband and I passed by a second hand book shop and a few pieces caught my eye, we went in and bought two hardcover books that are on sale for 2 for Php 99 (just a little over 1$ each). The books are in very good condition and they're something I wouldn't mind using for this project. I still feel a little guilty about cutting up a book but these ones I bought looked unwanted and would probably just go to waste, might as well make something useful out of them.

This is an easy project to make but the steps may take some time so patience is required. Let's begin.

Supplies needed:

- Hardcover book
- Craft knife or box cutter (with extra blades)
- Mixture of glue and water (80% glue, 20% water)
- Paintbrush
- Plastic wrap
- Ruler
- Pen
- Wrapping paper (optional)


Pick out a hardcover book. It should be in a good condition, no loose pages.


Wrap the front and back cover with plastic wrap so they won't be glued shut together with the book pages. Save a few pages, maybe the first 5 to 15 pages of the book, and wrap it together with the front cover if you really want your safe disguised as an innocent book so if someone opens it and lift up the cover, the hollowed space won't show right away. 

Since I'm going for a different look, I wrapped just the front cover without the first few pages.


Apply  a generous coat of your glue and water mixture on the page edges. I made my mixture in a shot glass and it was enough for the whole project.


Close the book and weigh it down with heavy objects to keep the pages together and make sure that they will dry flat. The picture shows that I placed three books on top but I actually added more just to be sure. 

Let it dry. I was doing something else while waiting for the glue to dry so I didn't get the chance to check it after 30 minutes or 1 hour but it was completely dry when I checked it out after 2 hours.


Now that the glue is completely dry and the pages are stuck together, they would stay in place when cutting out the compartment.


Draw an outline for the hollow area, with your ruler and pen, of the size you want it to be. I made a half inch border around it.


You can now start cutting. Using your ruler and craft knife, cut along the outline you drew.


Continue cutting and removing pages. After a few pages, you won't be needing the ruler anymore. Remember that the cutting process will be a lot easier if your blade is sharp that's why you need at least 2 replacement blades. My book is only about a little over an inch thick and it took me about an hour to finish, so yes, be really patient.


When you get close to the last pages, insert a piece of cardboard or your cutting mat between the pages and the back cover so you won't accidentally slice through the cover.


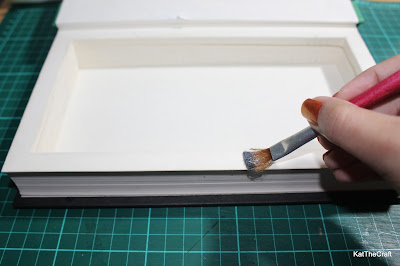
Clean up the inside edges with your X-Acto knife and brush glue all over. The glue will also smoothen out the edges of the cut pages a bit.

It's now time to place those weights back on top of the book and let it dry for as long as you think it would take to dry completely. I waited for 2 hours again for this.


Covering the book with a wrapping paper is, of course, optional. I just want this look for my book safe so when the glue dried, I went on to wrap my book with my chosen design.


As I've mentioned earlier, if you want your safe to be a top secret one and wanted it to look like a normal book, you should have a few pages saved and wrapped with the front cover. Now is the time to let them out of the plastic wrapper. Brush your glue mixture on top of the hollow area which are your borders, so when you close the book, the page before it will adhere to the glued part and will cover the secret compartment. When it's complete dry, carefully cut along the edges to reveal the hollow part.

***The 4 pictures above show the same process described, I just used the blue scrapbook paper instead of one of the saved first few pages of the book since I didn't save any. Adhering one page on top of the hollow area is a way to cover imperfections such as excess glue or the pen lines from outlining the borders.


Do the same with the back cover, remove the plastic wrap and brush on the glue mixture on the borders. Close the book, put some weights, and let it dry.


Your book safe is now ready. Cute, eh? Go on and stash your treasures inside. Christmas is just around the corner and I think this would be a nice gift for someone special. 


This one I made is really not that secure, so I don't actually place those valuable items there, I just put them there for the picture, haha. Keeping a book safe looking like a normal book and placing it on a bookshelf is probably a better way to keep valuables, thus serving its purpose as a safe. Mine is just a novelty type one, just a cute gift idea.

Thank you for stopping by. Now, I'm off to making another one. Ciao!


Read More »

Friday, September 4, 2015

Starting a Cross Stitch Project


We were checking out shops that offer framing services in a mall last week for our huge family portrait and we visited this needlecraft store that offers customized framing. When we were inside the store, I almost forgot what we went there for, haha, I went crazy over the stuff they have for sale, cross stitch kits, diamond stitch kits, dream catcher kits, and a lot more. It's no surprise since I'm always like this whenever I'm inside a craft store. I succeeded in leaving the store empty-handed but that visit inspired me to do cross stitch again so a few days later, I went to DMC Creative World in Megamall to get my cross stitch supplies.


My husband chose this Cape Cod House pattern for me. The pattern costs Php 220, has 9 pages, with 392 x 294 stitches, and the finished project would be 28" x 21" in a 14 ct Aida cloth. The size of the pattern is a bit intimidating but I like the challenge. The last time I did a cross stitch project was more than a decade ago and I was so excited to start again.

There was a note on the pattern that says "DMC dares you to finish this pattern! Be one of the first 50 to finish this chart and get a limited edition gift from us! Happy stitching!" Apparently, this pattern is included in their Dare Your Mind to Create promo wherein finishers of eligible patterns will receive prizes based on the pattern they did, there are different prizes for 2-page patterns, 3 to 4-page patterns, and 6-page or more patterns. Check out their Facebook page for more details.


I bought this set of tapestry needles for only Php 25 and the Aida cloth based on the pattern size for Php 571.50. 


The pattern calls for 51 different colors of embroidery floss and a total of 91 skeins because some colors require more than one, each skein costs Php 16.75. I remember, back in high school, it was only about Php 7 to 9 per skein, oh well, that was a long time ago. 


To get started, I photocopied the colored pages of the pattern so they're just in a copy paper that I could roll, fold, and mark on. I assembled all the pages to form this one whole pattern, it's about 2 ft by 3 ft big.


I also prepared this organizer to easily manage the embroidery floss colors. I just photocopied the page where the symbols with the corresponding color codes are, adhered it to a cardboard, cut by column, and punched a whole beside each symbol. This is where I could put in the length of the floss that I'm working with, about 24 inches, not the whole skein. The pattern needs 2 strands only so after getting 2 strands, each floss has 6 strands, I would just put in the rest to the organizer so it's easier to find the next time I need it. 


To prepare the Aida cloth, I just placed masking tape on the edges to avoid fraying and folded it to find the center as shown in the picture. I then counted from there to find all the sides and sewed along to mark the exact space that I'll be working on so I could start anywhere from the sides. Most people would just start stitching from the center so there's no need to find and mark the sides.


It's been two days and this is what I've got so far, haha, our household help/babysitter is on vacation and I only get the chance to work on this project when my daughter is asleep. Also, I'm kinda slow because I'm a bit OC with keeping the back clean, too, which is really hard to do so with this pattern, aside from making sure that all the top stitches face the same direction. 

This project will probably take a few months to finish so I'll just try to have a few breaks to make way for my other crafts. Bye for now!


Read More »

LinkWithin

Related Posts Plugin for WordPress, Blogger...