Tuesday, October 27, 2015

Rosary For Our New Baby


Last month, we got our new ride which I really like. We've been thinking about getting a new one for a while then decided just last month. I was reluctant at first because I love our Civic and it still looked very handsome, well it still does, it's with my father-in-law now, but my husband wanted to get a bigger one so I gave in. We got a Toyota Fortuner which he describes as "handsome and macho". In the battle between Montero and Fortuner, the latter won our hearts, haha. My brother got a Montero a few months ago and we were able to inspect it closely which helped us to finally decide on getting the other one. I guess Everest was also an option. 

Anyway, my husband asked me to make a new rosary to hang on the rear-view mirror because he's leaving the one in the old car where it is. I'm happy everytime my husband asks me to make something for him because I feel that he appreciates what I do. He doesn't really comment about the stuff I make here for our home like the organizers, decors, etc. but I know he supports me for he lets me buy whatever I want for my craft projects. So, since I was glad to be asked to make this rosary, I chose the best materials I have. 


There are now shorter versions of the rosary, the ones worn as bracelets or charms which some prefer so they can take the rosary anywhere with them. To make one, decide on the length you want to end up with, the bigger the beads used the longer the rosary will be. For the full rosary, the following materials are needed:

- String or cord
- 53 beads for the Hail Marys
- 6 beads for the Lord's Prayers (can be the same as the Hail Marys or bigger)
- 1 big bead for the center or one of those embossed metal charms specially made for this purpose
- spacer beads
- Crucifix 


This is a sterling silver pendant I removed from its chain. I used to wear necklaces before, now that I have a baby I don't anymore as she always pulls them. 


I have 6mm dark red rubies for the decades or the Hail Marys, a 12mm purple jade for the center or the Hail Holy Queen, and 8mm garnet stones for the Lord's Prayers.


This sterling silver metallic flex wire is very durable, it says on the package that the test strength is 13 lbs. and when knotted, the knot stays tight and secure.


These gemstones are Tanzanite, very rare, it can only be found in one place, Tanzania, and a bit more expensive than the others in this project. I used these as spacers between the bigger beads.


There's really no need for a tutorial, I think, as it's simply stringing the beads to the wire, just arrange them according to the right sequence. I just looked up an illustration of the rosary's anatomy online to be sure and went to work. It's like making a simple bead necklace except you would have the crucifix section up to the center as the pendant and instead of putting on locks, tie the cord to finish and hide the knot among the beads.


Here it is hanging perfectly on the rear-view mirror. My daughter loves the color of the beads and she always wants to grab it, good thing she listens to her Papa when she's told not to. 


Meet Tuni, our new baby, we call her that because well, she's a Fortuner. My husband's car when we we're still dating was named Vic-ci (pronounced as Vixi) because it's a Civic, then the last one we had, also a Civic, was Ivi from i-VTEC. Do you also name your cars? It's actually fun playing with the letters from the model or the make to come up with the name though it can be just anything else.


And this is what's inside, us, haha, with my baby behaved on her car seat. We're gonna have a car blessing this week before our long trip and we'll have the rosary blessed, too. 

Thanks for visiting. Have a blessed day!


Read More »

Friday, October 23, 2015

Jordana's First Halloween Event

Last October 17th, we joined Mommy Bloggers Philippines Spooky Circus Halloween at Sky Ranch Tagaytay. We're excited about this event because it's Jordana's first time to join, yay! Halloween for kids means Trick or Treat and, of course, wearing costumes.

Jordana's not new to wearing costumes as we had her monthly photo shoot since her first month until she turned one, and she would wear three different costumes in each photo shoot but it's only for 30 minutes. This time, she would wear her costume longer so we need one that's really comfortable on her. We were thinking of dressing her up as Cruella de Vil or Bride of Chuckie, haha, but it would require make-up and I still don't want to put make-up on her delicate face. So, we just visited SM Store and chose from their available costumes, there were a lot to choose from but most of the ones we really wanted were for bigger kids, the Maleficent costume was really nice but there's no size available for her and she would probably end up removing the headpiece anyway. We tried a few pieces and decided to get the Wonder Woman costume. 


She's so happy trying on her costume at home. The set didn't include the lasso, I just added it to complete the Wonder Woman look. I made my own paper twine and painted it to match the outfit.


We arrived early at Sky Ranch and there were still only a few people in the event area so we just walked around a bit. Jordana enjoyed running around while my husband and her babysitter, Ate Manel, were running after her and I was busy taking pictures.


She was already sleepy when the program started, haha, but luckily, she was still happy to go up on stage to present her costume.


There she is, my little Wonder Woman, together with the other kids. They all look cute and lovely in their costumes. There's Princess Leia who won first place, isn't she cute? Since the contest is over, I guess it's okay to reveal that I voted for Princess Leia as my top one, haha. I'm a big Star Wars fan and Jordana actually had a Princess Leia costume, too, when she was still a baby.


Jordana didn't place but we're so happy that she looked really adorable and enjoyed walking around as Wonder Woman.


The kids had fun with the games, the magic show, and balloon twisting by Mr. Poch, who was also a funny ventriloquist. There was also Trick or Treating but my baby was already asleep at that time so she wasn't able to join. 


It was a fun experience, even with the bad weather. The fun didn't stop even after the program as there were rides for the kids to enjoy.


Here we are just roaming around with my sleeping Wonder Woman. 


When Jordana woke up, she was once again energetic and ready to have fun. It was raining but we're still able to let her ride the carousel. 


Unfortunately, the weather didn't improve so we decided to just go shopping for pasalubong and leave early, and just went for Bulalo which was perfect for the cold weather. 


It was all in all, even with the fog and the rain, a fun day for us.  We went home with these goodies and I even won two tickets for the upcoming Disney On Ice show, how cool is that? 


Mommy Bloggers Philippines Spooky Circus Halloween event was made possible by generous sponsors and a team of mommies who love this blogging community.

Thank you to Sky Ranch Tagaytay who not only provided us with a venue but also made sure we had a great time by providing ride all you can tickets and delicious food from Kenny Rogers!

Special thanks to Mr. Poch Albiso, the Magic Meister who made it the most enjoyable day with his magic show and games. 

Our generous sponsors, Nido 3+, Krispy Kreme , Araneta Center, Summit Media, URC, Yeah! Shoot Photobooth, Lock and Lock, First Vita, Jardine Distribution, and Jollibee for their support, giving us giveaways and prizes.


Thanks to MBP for this event. Hope to see you all again!


Read More »

Thursday, October 22, 2015

Celebrate Halloween at Sky Ranch Tagaytay

We recently visited Sky Ranch Tagaytay and we had a great time. The place is really nice, we all felt closer to nature, and there were fun rides to enjoy. I wanted to try the zip line but wasn't able to, maybe next time.

Sky Ranch Tagaytay is a great place for everyone. Halloween is just around the corner and if you want to spend a fun-filled day with your loved ones on Halloween, Sky Ranch is here to cater to your needs for a day of fun. 

Have a wickedly fun Halloween at Sky Ranch Tagaytay! It’ll be an all out Halloween festival with activities and games planned specially for you! Enjoy a scavenger hunt, dancing and a mystery game. 
There’ll be a costume contest to boot! The best 5 Halloween costumes will win special gifts so make sure to dress to impress. Whether you’re scary, funny, spooky or magical you’ll be celebrating in the spirit of this wickedly fun holiday.


Sky Ranch Tagaytay has many rides to conquer and to make your amusement park experience all the more memorable they’re improving the park by adding more thrilling rides.
Their new rides include the BUMPER BOAT, BOAT PARADE, CHALLENGER, and CITY RAIL. 
The wide expanse of the park also includes dining establishments, gazebos and an events venue for special celebrations.
You’re in for even more of a treat as Sky Ranch extends its Great Days Treat! Bigger savings means more fun! 
Their special admission rates are now only Php50 from Mondays to Thursdays and Php80 from Fridays to Sundays including Holidays from November 1 to December 18.


Sky Ranch Tagaytay is open on Mondays to Fridays from 10am-10pm and Saturdays, Sundays, and Holidays from 8am-10pm.
Parking rates:
Bike – Php30.00
Car – Php50.00
Bus – Php150.00

Gazebo:
Gazebos are available for rent. Guests may order food from our restaurants and dine in one of our spacious Gazebos with the cool Tagaytay breeze and the majestic view of Taal Volcano. Below are the corresponding gazebo fees:

Php 750.00 – Weekdays (Mondays to Thursdays)
Php 1,000.00 – Friday, Saturday, Sunday and Holidays


With these fun activities and rides, your day at Sky Ranch would definitely be a day to remember. See you all there!


Read More »

Monday, October 19, 2015

How to Make Mini Book Charms

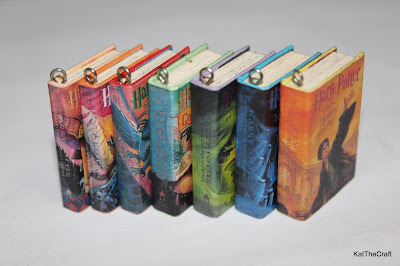
Harry Potter Mini Book Charms
I still have a hangover from the release of Harry Potter and the Sorcerer's stone: The Illustrated Edition and after rereading the whole series for the nth time, I got inspired to make this project, mini Harry Potter books.

Of course you can choose any book you want. I showed my finished work to my sister and niece and they right away requested for the mini versions of their favorite books.


To make this literally small project, you have to prepare your book cover for printing, any book you like or you can just make a book design of your own. For me, it's the Harry Potter series, starting off with the first book. I found some book covers online that are ready to be printed but I wasn't satisfied with them, some were just illustrations used in the dust jacket without the other details like the small texts, barcode, etc. so I just scanned the dust jacket from my book to make a better version. 

***This step, scanning the dust jacket of the book, was done because my OCD kicked in and I got worked up with such small insignificant details that wouldn't even be obvious on such cute versions, haha. Skip this if you're happy with those book covers of your choice that you can find online.


If you already have your book cover, print it according to your desired size. I just used a regular copy paper.


Cut the print out and fold it on the right places. This now looks like a mini version of the dust jacket


Get a cardboard, I used a cereal box, and cut it according to the size of the print out. To form the spine, cut on the surface lightly, not all the way through, just so you can fold it neatly


Cover it with colored paper that will match the dust jacket. This will serve as the mini hardcover for the book.


Adhere the dust jacket carefully and smooth out any lumps. I used Mod Podge on this. Now the cover is ready.


Prepare the inside of the book, the book pages. I used these pages from the project I did a while back, a hollow book safe.


Based on the size of the book cover, cut out pages enough to fill the thickness of the book. As this is going to be a book charm, I left a space where I can put an eye or a head pin in. To do this, a few pages in the middle should have a width 1mm narrower than the others.


Use binder clips to make the pages stay in place, brush glue around the edges, and let it dry.


When the inside of the book is already dry and all the pages are stuck together, put in the pin in the space provided for it, make necessary adjustments on the pin using your pliers or wire cutter.


Apply glue on all sides.


Place the cover and press tightly. Let it dry, put objects on top as weights.


Coat with glaze or decoupage sealant for a nicer finish. 


Ta-da! A mini book charm.


Well, continuing with my Harry Potter fix, I did all the other books in the series.


A keychain I made using the mini book charm and also a mini Gryffindor scarf with the Deathly Hallows wire pin.


And, another way to show that you are a proud Potterhead, a bracelet with all the books in the series. Cute, eh?

This would be a great gift, don't you think? Specially for your bookworm friends. You can also use this as a pendant, a fancy bookmark charm, or just anything you can think of. 

I hope you enjoyed this tutorial and feel free to ask questions or share your ideas. Thank you so much for reading. Gotta go...  Accio Firebolt!


Read More »

LinkWithin

Related Posts Plugin for WordPress, Blogger...