Monday, November 23, 2015

Doily Dream Catchers - Wishing You Happy Thoughts and Sweet Dreams


Dream catchers are handmade objects hung near the bed or the place where one sleeps to protect a sleeping person from bad dreams. It is said that bad dreams will be caught in the web and only good dreams will pass through making the person nightmare free through the night. The bad dreams that were trapped will disappear when the sun rises. For its origin, you may want to seek the help of our dear friend Google as I only just looked it up and I must say that it's fascinating. The Native Americans from whose culture this craft originated have a beautiful and spiritual story to tell about dream catchers.

I've also read that nowadays, some people hang dream catchers by a window or a door to make it work like a filtering system so that only positive energy gets inside their homes. Well, wether we believe in it or not, we respect the culture where it came from. It is a fascinating tradition, a superstition if you will, and the thought of giving someone a dream catcher is like wishing them to always have a peace of mind and good dreams, plus, it is decorative.

This design using doily is a modern take on the traditional dream catcher, even the materials used are different. I also tried weaving but I only know the basic style and there are others that are so beautiful and intricate but look really complicated and I couldn't make out the pattern by just scrutinizing it on my own, I need a pattern or a tutorial. Anyway, I love crochet and making doilies for dream catchers would allow me to have various different designs for the web as there are hundreds of patterns available online.

First, you have to gather the materials needed. There are a lot of different materials that you can use to make a dream catcher, a hoop made from cardboard, an embroidery hoop, or a metal ring as a substitute for the wooden hoop, for wrapping the hoop, a leather cord or any ribbon will do, and you can go and have fun with the tails and other decorations, you can use lace, ribbons, charms, beads, or pearls. Well, these are for the modern ones, if you want to have the look of the authentic dream catchers by Native Americans, you may need different materials and do a little research.

Anyway, with my version, the following materials are needed:

Hoop (your choice of size)
Yarn or crochet thread
Lace, ribbon, feather, beads
Glue
Needle
Scissors
Crochet hook


Crochet a doily that would fit on your hoop. You can check out these sites for free patterns, FaveCraftsCrochet Pattern Central, and All Free Crochet. If the pattern would result to a doily bigger than the size of your hoop, you just have to end your work up to the the round that best fit the ring.


This pattern I used calls for several more rows but I stopped at the 5th row because I'm using a small hoop. As an added decoration, I put a bead at the center. Keep in mind that the doily would still stretch so it should be smaller than the inside of the ring to get a nice tension.


Position the doily and attach it to the hoop. I used a tapestry needle to wrap the crochet thread around the hoop and into the spaces in the doily. This thread is only temporary, just to keep the doily in place while I wrap and cover the hoop completely with a different color thread.


Carefully wrap the hoop with yarn or crochet thread, remove the temporary thread as you go along. A lengthy piece of thread is needed to cover the entire hoop and you might not want to thread the needle with the full length at once for it will be hard to work with, just put in about 3 feet each time or the length that you're comfortable with. Glue the start of the thread to the hoop make the rounds and also glue the end, do the same with the next lengths of thread until the hoop is entirely wrapped.

I find it nicer looking when the hoop is completely covered and no wood is showing as much as possible so make each round tight and close to each other. Apply a small dot of glue after every few rounds, this may not be necessary, just an additional trick to secure the thread and keep it in place.


I attached a crocheted chain and had it covered together with the hoop. With my other dream catchers, I attached the strings on top of the covered hoop, so it's your choice, it would look just as nice.
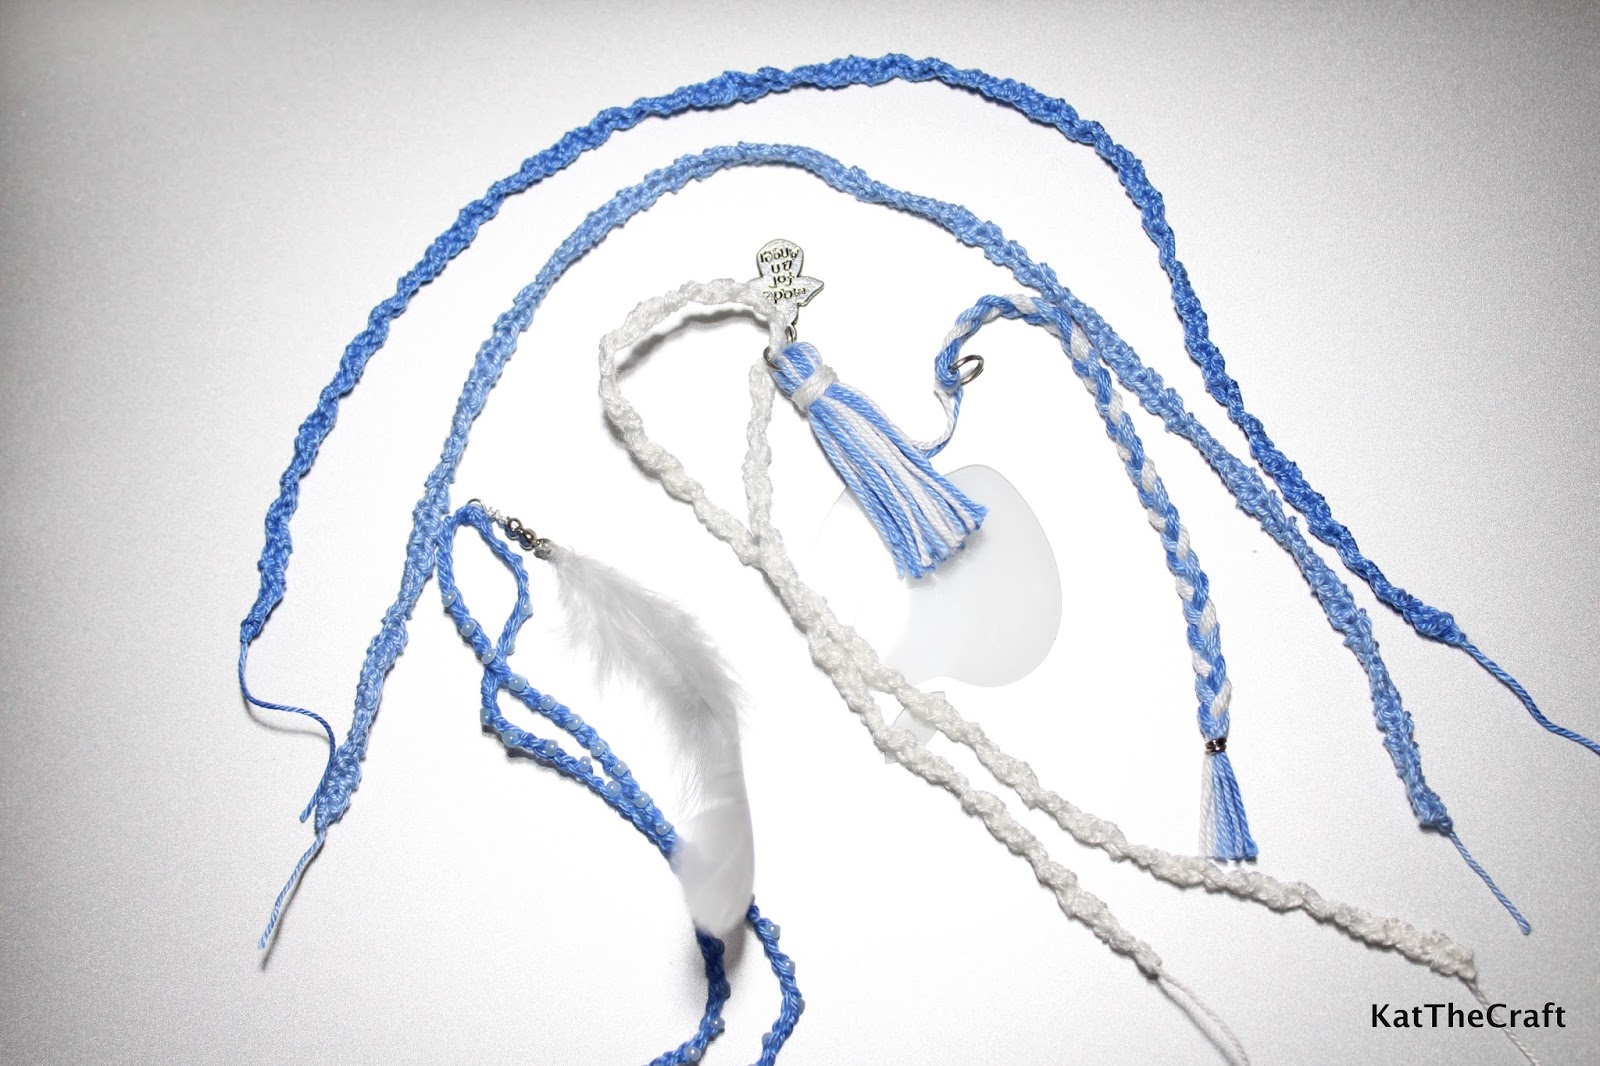

Then, it's time for the tails and decorations. I braided and crocheted a few ribbons, made a tassel, attached a feather to a crocheted chain, and added a little metal charm. But like what I've said, you can use whatever materials you want that you think would make your dream catcher look lovely. Attach your chosen pieces to the hoop
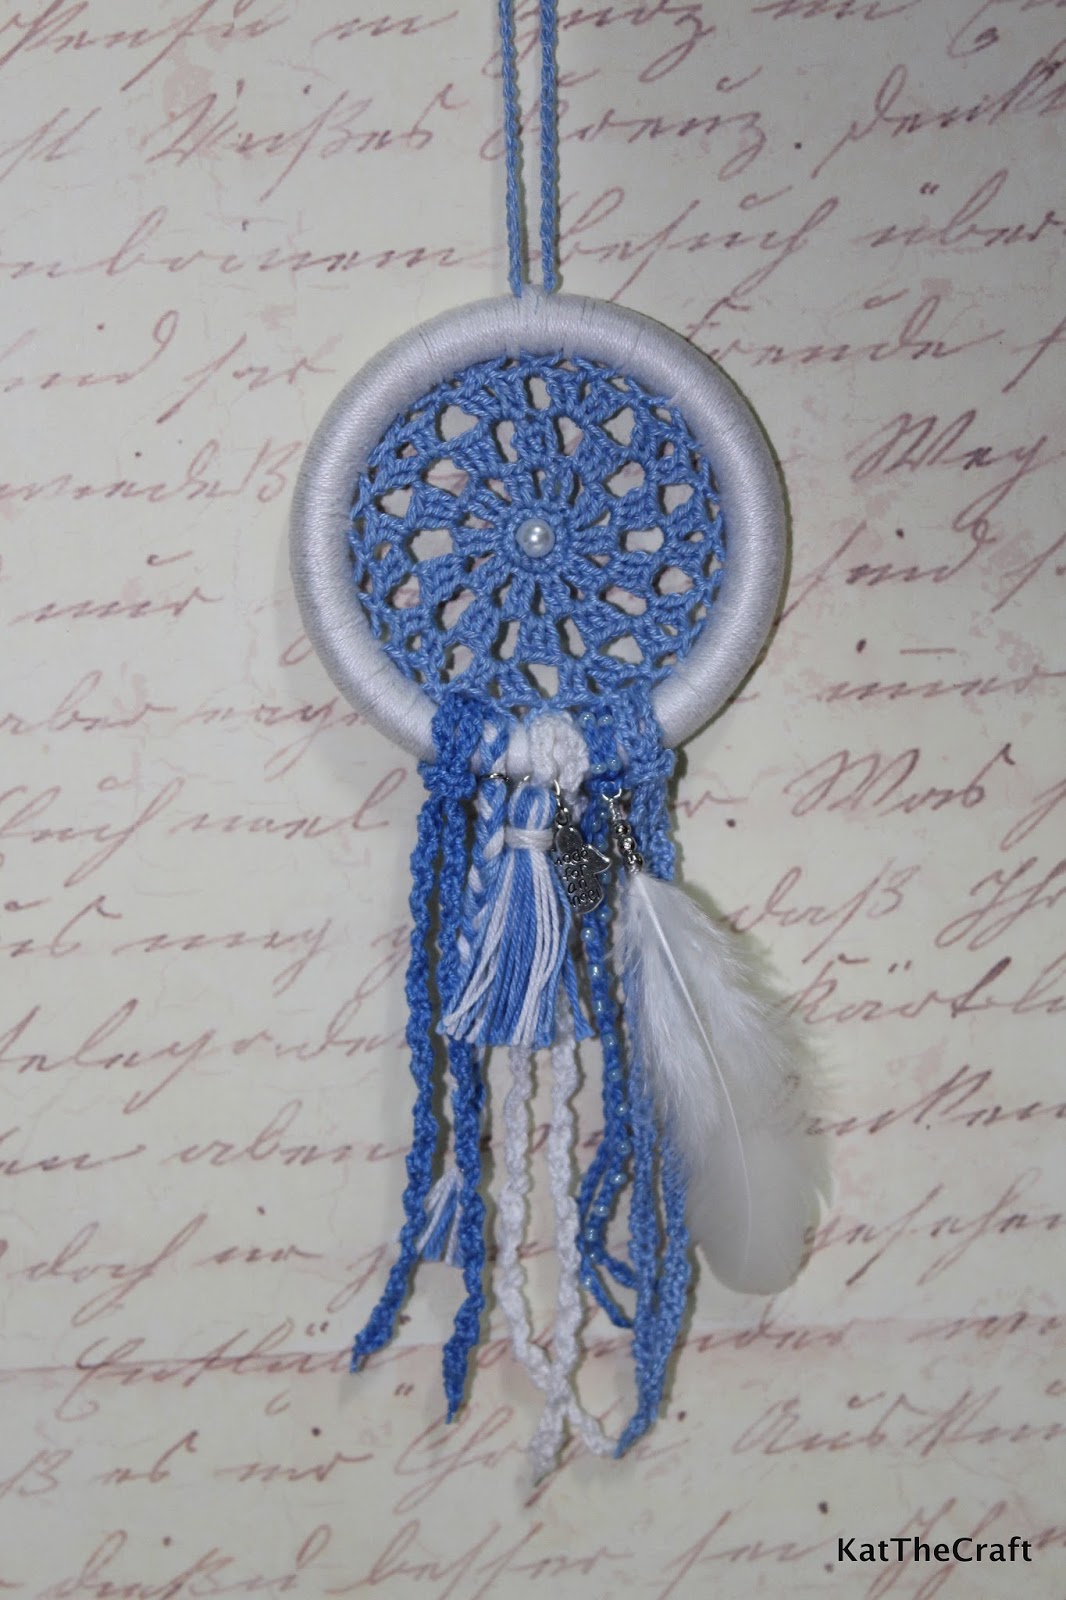

This is the first one I made. I used white and light shades of blue crochet thread. This is a bit small, the hoop is just about a little over 3 inches in diameter.


These are the ones I've finished so far. I'll be making more and probably play with some bold color combinations. I hope to finish about twenty pieces in time for the holidays, I think these will make good Christmas gifts.

These may not be the authentic and traditional dream catchers but my thoughts of giving them to my loved ones have the same purpose, wishing them sweet dreams.

Hope you enjoyed reading. Have a nice day!


Read More »

Friday, November 13, 2015

Mixed Craft Supplies Haul

Whenever you think of shopping online from shops in the US or anywhere abroad, or a loved one would send you a package, what are you excited about buying? Clothes, shoes, bags, makeups, perfumes, or gadgets perhaps? I also love those stuff of course, I would get at least a pair of shoes or two, perfumes, and bags, specially those that cost double here in Manila but along with those ladies' staples, I'm always excited and happy to receive my craft supplies. Most of these craft materials also cost double here as most are only available from individual online sellers and they probably just have their supplies shipped from abroad as well and they still have to add a little amount on top of the item's actual cost and the shipping, it's business, can't blame them, really. 

Anyway, I just want to share these few stuff I got recently for my crafting needs. 


I'm now dabbling with polymer clay so I got this Jacquard Pearl Ex Powdered Pigments set, it's used to add color and shimmer to clay, I also tried mixing it with acrylic paint and the result was great, the mixture shimmered. I also got these tools for clay molding, the stainless spatula set and the acrylic roller. This acrylic paint set can be used with my other craft projects but I got this for my air dry clay, I have plain white air dry clay that can be kneaded with acrylic paint to have color. I still haven't tried it but I'm hoping to get good results.


These are for paper crafts. The Martha Stewart Scoring Board and tool, this is really helpful when making envelopes, paper boxes, or bags, I'm gonna be busy with it this Holiday season. I've already used this Cricut portable trimmer and I loved it, so easy to use and big enough for 12" sized paper or cardboard. Another one from Cricut is this scraper and spatula set, for scraping unwanted stuff from any surface, I'd probably use it with my clay tools, too. I also got this corner rounder set of two, 1" and 1/2", this is for making gift tags and paper bags, so this will be well used this Christmas.


Most of my craft projects use Mod Podge glue and sealer and this is something that should always be present in my craft area, I still have the gloss finish but I also want to try this sparkle one, it's just like the gloss finish but with tiny glitters leaving a nice sparkly look. The Mod Podge Dimensional Magic is a new one for me, I really wanna try it as I've seen beautiful projects using this, it adds glassy finish and dimension to a surface, so cool for making jewelry and accessories, I don't know how to explain what it does exactly but you can check out this tutorial from Mod Podge Rocks to see its wonders.

One of the must-have tools that a crafter needs is a craft knife.  I already have the X-Acto precision knife and just wanted a spare one and a few refill blades but my mom got me this set, I love her, she's so thoughtful.


This lot is for jewelry making that I intend to work on again after the projects I have lined up. I got the ring display hand, the display bust for earrings and necklaces, the magnifier with lamp that can be used hand-held or hands-free, and these assorted pearls and gem stones that are so inviting but like I said I still have some projects to make, mostly for Christmas presents, jewelry making will have to wait.

These are all gifts from my mom, by the way, early Christmas gifts indeed. She got them from Hobby Lobby, Jo-Ann, and Walmart, the pearls and gem stones were from various online stores, the labels show Artbeads.com, Beadaholique.com, Beadalon.com, Jewelrysupply.com, and Firemountaingems.com and some, according to my mom are from trusted eBay sellers.

I still have a lot of supplies I haven't touched yet but I'll get to them real soon and to this new batch as well. It's just sometimes tricky to be in the zone with my crafts while overseeing my two-year old girl, she has a nanny and she can see me from my craft area but she always wants to be with me and join in the fun, haha. 

Till next time. Bye for now!


Read More »

Tuesday, November 3, 2015

DIY Birthday Banner and Fun Celebration for Our Little Snow White


I recently posted an entry about my DIY birthday cake decorations for our little girl's 2nd birthday. This one here is the birthday banner I also made with the help of my husband. 


So, the title says that it's for our little Snow White. It's because it was a Halloween themed party and we wore costumes. The birthday girl, our Jordana Kendall, was Snow White. I really think she loved her dress and whenever we asked "Where's Snow White?" she would answer "Here!". So adorable.


I asked my husband to make these letters, he's better than I am when it comes to Photoshop or whatever app is needed to make these. 


I used this circles template to print on the patterned paper for the background. So with this I could make 2 circles from a letter size paper.


These are the patterned paper I used. After printing the template on each page, I cut out the circles.


Then I printed the letters based on the size of the circles template I used earlier, just a few centimeters smaller. I love the border on the Happy Birthday letters, M&M's!


After cutting out the letters, I adhered each one using glue stick on the cut out patterned paper circles.


To form the banner, I taped a ribbon on the back of the circles to connect the letters together. I just eyeballed the distance between each letter.


Here is the finished project. My sister-in-law and my brother-in-law's girlfriend helped to put this up. It was a bit tricky attaching the ribbons to the curtains. I was expecting to have the decorations on the wall but the best place to set up the table was in this area. The venue for the party was in one of the two private villas we're staying in at Holiday Inn, Clark so I didn't know how the place looks exactly until we got there, I only saw a few pictures of the villa online. 


Since we made it into a Halloween themed birthday party, the party favors were small pumpkin pails containing chocolates with a Thank You tag. 


There is my happy Princess together with the other kids, they're just my nieces and nephews since this is just a small family gathering. That's me, the White Lady, haha. 


Jordana calls his Papa's Halloween look Papa's happy face. She was curious at first and tried to touch my husband's makeup a few times but she was not scared at all, I'm so proud. 


The next day was all about swimming, specially for the kids. Jordana enjoyed so much and wanted to stay in the water longer but her hands and feet were already too wrinkly and we had to get her out.

Well, that's our DIY birthday banner and small party for our Snow White. Check out also my DIY birthday cake decorations here.

Thank you for reading. Bye!


Read More »

Monday, November 2, 2015

DIY Birthday Cake Decorations for Our Princess


It was my daughter's 2nd birthday last October 30 and we had a last minute preparation for the party as we didn't plan on having one. Our original plan was just to go out of town, stay in a resort, and go swimming with the family, then my husband and I thought, why not hold a nice birthday party since we're preparing food for the vacation anyway. 

We stayed at Holiday Inn Clark, got two private villas as families from my side and Jeff's, my husband, were present, and we wouldn't fit in one. We decorated the place ourselves with DIY banners and balloons. And, since we didn't have enough time, we weren't able to order a customized cake for our princess, Jordana Kendall. We didn't have a theme in mind so I just thought of having a Kitkat and M&M cake and with just a few decorations added. 

Okay, so there wasn't a theme for the party but since it was Halloween, I asked the family if they would want to wear costumes, at least the kids, they all said yes and didn't mind if they have little time to prepare, the kids were all excited to dress up. Anyway, that's for another blog post, I'll just show here how I ended up with this birthday cake for my little girl.


First, I printed out letters to make up the Happy Birthday banner. I tried a few different sizes, chose the best fit, and cut the letters out. I got this alphabet design from MeinLilaPark, she has lots of free printables, from calendars and gift tags to scrapbook paper designs, frames, and more.


I cut out small triangles from a card stock for the banner enough to fit the letters.


Taping the triangles on to a ribbon would do but I just did crochet to connect the triangles together to form the banner.


It's done and ready to be tied onto the sticks.


I used these bamboo skewers wrapped with paper tape to hold the banner.


For my little girl's name, I cut a printout and adhered it to a card stock, cut it out again and taped a skewer on the back so when the skewer is inserted into the cake, the sign would stay up.


Then, I had this cake prepared, mmm, it looks yummy. It's just a 9-inch chocolate caramel cake we bought from a bakeshop chain here. I arranged the Kit Kats around the cake, pressing them gently onto the side to make sure that they would stick to the frosting. I used up 22 2-finger bars of Kit Kat. Then, I just poured the M&M's on top of the cake, scattered them to make sure they covered the top nicely, and pressed them so they would also stick. I bought two 200-gram bags of M&Ms but I only needed 1 and a half bags. The ribbon is just for decoration, all the Kit Kat bars stuck nicely even without it.


Adding the decorations was easy, I just inserted the skewers in place. I think the sign for the name was too big as it blocks part of the birthday banner but there wasn't a chance to change it as I don't have my printer and the materials with me, we were already in the villa when I prepared the cake. Anyway my husband said it still looks nice. We also added this purple number 2 candle for my daughter to blow, she wasn't able to blow the flame off but she did look cute trying, haha. 


Here's our little Snow White enjoying her cake. We let her pick up a few M&M's to eat, she would pick one, raise it and show it to us, and shout what color it was, so cute. Oh, how time flies, my baby is already a little girl. 

This cake may not look healthy, well it sure isn't, but sweet treats once in a while wouldn't hurt, I guess, haha. Thank you for visiting. Happy Halloween!


Read More »

LinkWithin

Related Posts Plugin for WordPress, Blogger...