We don't have winter here in the Philippines but I made a pair of mittens for my little girl. Why? Because of that Three Little Kittens song. You know, those three little kittens who lost their mittens, found their mittens, soiled their mittens, and washed their mittens. Well, Jordana, my cute little kitten, loves the song so much, she knows all the words and one day she just asked me, "Mama, let's buy mittens tomorrow, please?" She knows the word 'buy' already, haha. I know that it just means 'get' for her but she knows that if we don't have it in the house, the term to use is buy. I guess she thinks it would be more enjoyable to sing when she has props. Anyway, I have all the materials so I decided to just make my daughter her own mittens. I like making stuff for her, she's so appreciative.
I'll be sharing here how I made this cute pair of mittens, the process and technique can be used with any size or style you want but every count here is based on the size and shape of my toddler's hand. This is only a guide, you can just easily adjust the stitch counts or number of rows according to the size or shape you want to make and the materials you're using. If you feel that the next row should already be bigger, make some increases, if smaller, make some decreases. As you may see, this is for someone who already knows how to crochet and is familiar with basic stitches but it's still on the easy level.
Yarn (I used an unusual one, it's a loosely plied acrylic yarn I got locally)
Crochet hook (I used 1.60 mm sized hook)
hdc - half double crochet
Start with the cuff.
Row 1: dc on the 3rd chain from the hook, dc in each stitch across, chain 2, turn
Row 2 and the next rows : dc in each stitch across, chain 2 turn
Last Row: dc in each stitch across (no chain 2)
I did rows based on the size of my baby's wrist. I ended up with a total of 20 rows.
Have the ends meet and join by doing slip stitches across.
The side with the joining stitches is now the wrong side, turn the work inside out to prepare for the next step. We now have a round cuff. We'll be working on the edge of the cuff to start the hand part.
Round 1: 2 hdc in each dc row on the cuff. (40 sts.) Work in rounds, I always do because I find it easier. Don't forget to use a stitch marker when working in rounds.
Round 2-4: hdc in each stitch around (40 sts.)
Since this is for my baby and she's here with me, I just kept on checking the fit. It showed on our fitting that an increase on the number of stitches should be next.
Round 5: *3 hdc, increase on the next*, repeat from * to * around. (50 sts )
Round 6-8: hdc in each stitch around (50 sts.)
I checked the fit again and the next step would be the preparation for the thumb provision. I measured the space needed for the thumb and marked the stitch where it ends.
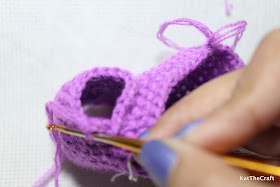
Round 9: Chain 6 and sl to the stitch on the other side to form the thumb hole as shown in the picture, hdc in each stitch around. (44sts, *12 hdc from the previous row goes to the space for the thumb hole, 50-12 =38 plus the 6 chain sticthes, thus 44sts.)
Continue working in rounds, the next row should include the 6 chain spaces.
Round 10: hdc in each stitch around (44 sts.)
This is the bigger part, the one for the rest of the hand. I could continue working on this but I decided to work on the thumb just in case there would be an adjustment needed, if the hole is too small or too big, so I won't need to undo a lot of work. So this part is to be continued....
(Or you can go ahead and continue on Round 11 shown several lines below and finish, and come back for the thumb part if you wish.)
Now, working on the thumb. I got the other end of the yarn from the cake so I could start on the thumb without cutting the yarn used on the bigger hand part.
Slip knot and jojn using sl. It can be joined in any stitch, I just chose to start the round in the beginning of the previous row of hdcs.
Hdc in the same space where the joining sl is, hdc in each stitch around. There should be 18 sts, the 12 hdcs from the previous row and 6 sts from the chain dividing the thumb and the bigger part. Continue in rounds, hdc in each stitch around. After the 4th row, still working in rounds, decrease around continuously until it closes. you can turn it inside out before weaving for a tidier finish, cut the yarn, fasten off, and weave in using tapestry needle.
... Continuing the hand part.
Round 11-12 : hdc in each stitch around (44 sts.)
Round 13: * 2 hdc, decrease*, repeat from * to * around. (33 sts)
Round 14: hdc in each stitch around
Round 15: *hdc, decrease* repeat from * to * around (22 sts)
Round 16 onwards: decrease around continuously until the hole is small enough to close.
Cut the yarn, leaving enough length for weaving and fastening, turn the mitten inside out and work on the wrong side. With a tapestry needle, close it if there's still a small hole showing from the last round, fasten off, and weave in.
If it's a pair of mittens you need, just make another one using the same process, there's no print or design so it can be for either hand.
As expected, Jordana enjoyed the mittens very much. She was singing the kittens song nonstop. When the song says lost their mittens, she would leave the mittens on the floor pretending she lost them, when the song says found their mittens, she would pick them up and show them to me, well, you get the picture. It was so fun watching her. Simple things really make her happy. While I was still crocheting, she already knew that I was making her mittens since I kept on checking the fit on her hand, she actually sat beside me and watched for a while like she's waiting for me to finish, so cute. She's now wearing her mittens almost all the time but she would take them off when she's having a hard time doing something, she even fell asleep with her mittens on, lol. This would probably last for a few more days till she moves on to a new toy. I love that this simple thing, which cost us nothing, brought her so much happiness. :)


