
 |
| My very own watch organizer in lovely colors. |


This is the case I bought before for maybe Php 1300 - Php 1500 (roughly 30$), now, looking at that price, all I can think of is I can already buy my baby's formula with that amount. Yes, a lot of things have changed now that I'm a mom. So for me to have one like that, or at least something that will serve the same purpose, I gotta make it myself.
I decided that I want the same number of compartments for my box so I looked for a box close to the size of that case. Good thing I still have one of my shoe boxes left, I don't usually keep them because their small for storage purposes, but my husband's shoe boxes are big and those I always keep because they're really useful. Okay, so I measured the height of the case, it's about 3 inches, including the 1 inch lid, and I based my project from that.
To make this project, you will need:
Scissors / cutter
Ruler
Pencil (for marking)
Glue or paste, hot glue
Shoe box (or any box of your choice)
Scrapbook paper (or any wrapping paper you have, fabric is also recommended)
Ribbon
Fabric
Stuffing (can be fiberfill, foam, or even sponge)
Fabric
Stuffing (can be fiberfill, foam, or even sponge)


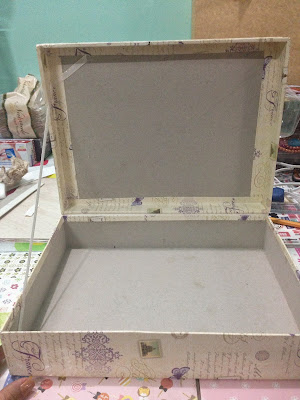
This is the box I have, the height is about 4 inches. I measured and marked 2 inches for the base and 1 inch for the lid. I'm making a new lid because I don't want it to overlap or cover part of the base, I want it to have the same length and width as the base so it would be exactly on top of it when closed just like the case I'm trying to make a version of.


I cut the box with a cutter, first the base and then the 1 inch part for the lid. I forgot to take a picture of that one, anyway, it's just the same process. To make the lid, I remove the four sides of the original lid to make it the same length and width as the base, as shown below:


Then I replaced those four sides with the 1 inch part I cut earlier by gluing them on top of what's left of the lid. I used hot glue on this because it dries faster.


I then covered it with this glossy wrapping paper (you can also use fabric on this or whatever you have available) using a bit watered down white glue and paint brush. I read somewhere that it should work like mod podge, so I tried it and I think it worked, though I have more lumps on the wrapper than usual, maybe I put in too much water. I don't have the step by step process for wrapping the box but it's simple, just wrap each part, the lid and the base, separately, like wrapping a present.

I just wrapped the outside and didn't wrap the whole inside part because it will be covered later, both for the lid and the base. I also want it to open and close like that so I needed to connect them together on one side.


To connect to each other, I glued a piece of the wrapping paper on one side of each part. Now it can be opened and closed.
I attached a ribbon using hot glue connecting the base and the lid to keep it from opening all the way up, the length of the ribbon is just enough for the box to open up to a right angle.


I just glued the top part to keep it from unraveling.


is my favourite. It's simple and affordable, it would be a nice addition to my collection.
But enough of that for now, I'm just so glad that I was able to make a project that's really useful. I'm planning to make more organizers for my other stuff sometime soon. I hope you like this. Happy crafting!


I finished the lid using a wrapping paper with a different print to cover up the rest of the lid.
The next part, the compartments. I was planning to make partitions using cardboard, unfortunately, I'm all out of cardboard except for the cereal boxes I'm saving for my next project. Besides, I think I'll be bad at trying to make all the partitions straight. So this is what I did, origami boxes. I just used the scrapbook paper I have and it worked out just fine. To make these boxes, I followed this video tutorial by Heather of the happypuppytruffles channel on YouTube. Her tutorial is great, you will be able to make any size of rectangular origami box with the help of simple math. To go to her video tutorial, click this link.


I just glued the top part to keep it from unraveling.

I made 10 boxes, and now it already looks like an organizer for small jewelries or other stuff.


There was a small gap on the sides so I wrapped pieces of cardboard to fill up the space.


Now that the boxes fit perfectly, I glued them to keep them in place.
And we're on the last part, the little pillows. I'm not in the mood for sewing so I just used a shortcut, yes, hot glue. I measured the boxes and added 1cm on each side of the fabric for allowance.

To make these little pillows, glue the sides of the fabric, leaving one side as the opening.

Turn it inside out and fill with stuffing.


Close the open side by folding a little part of the fabric towards the inside and glue the folded parts together. Voila, cute pillows.


Now, to the quality control department for testing, lol. That's my baby playing with the little pillows.


And here is the finished project. I like it a lot, specially because, everything that I used here is already in my stash. So, the next thing to do is fill it up with new watches, gosh. I haven't tried shopping for watches online but I checked out a few sites. I'm eyeing some watches on this website - ZALORA offers a wide selection of watches but this one
 |
| Image grabbed from ZALORA website. |
But enough of that for now, I'm just so glad that I was able to make a project that's really useful. I'm planning to make more organizers for my other stuff sometime soon. I hope you like this. Happy crafting!
