
 |
| DIY Book Safe |
This is an easy project to make but the steps may take some time so patience is required. Let's begin.
Supplies needed:
- Hardcover book
- Craft knife or box cutter (with extra blades)
- Mixture of glue and water (80% glue, 20% water)
- Paintbrush
- Plastic wrap
- Ruler
- Pen
- Wrapping paper (optional)


Pick out a hardcover book. It should be in a good condition, no loose pages.


Wrap the front and back cover with plastic wrap so they won't be glued shut together with the book pages. Save a few pages, maybe the first 5 to 15 pages of the book, and wrap it together with the front cover if you really want your safe disguised as an innocent book so if someone opens it and lift up the cover, the hollowed space won't show right away.
Since I'm going for a different look, I wrapped just the front cover without the first few pages.


Apply a generous coat of your glue and water mixture on the page edges. I made my mixture in a shot glass and it was enough for the whole project.

Close the book and weigh it down with heavy objects to keep the pages together and make sure that they will dry flat. The picture shows that I placed three books on top but I actually added more just to be sure.
Let it dry. I was doing something else while waiting for the glue to dry so I didn't get the chance to check it after 30 minutes or 1 hour but it was completely dry when I checked it out after 2 hours.

Now that the glue is completely dry and the pages are stuck together, they would stay in place when cutting out the compartment.

Draw an outline for the hollow area, with your ruler and pen, of the size you want it to be. I made a half inch border around it.


You can now start cutting. Using your ruler and craft knife, cut along the outline you drew.


Continue cutting and removing pages. After a few pages, you won't be needing the ruler anymore. Remember that the cutting process will be a lot easier if your blade is sharp that's why you need at least 2 replacement blades. My book is only about a little over an inch thick and it took me about an hour to finish, so yes, be really patient.

When you get close to the last pages, insert a piece of cardboard or your cutting mat between the pages and the back cover so you won't accidentally slice through the cover.

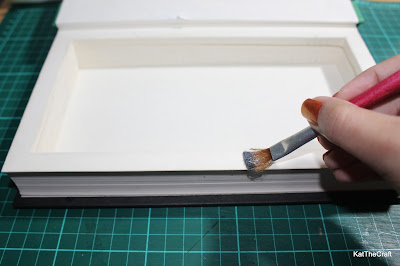
Clean up the inside edges with your X-Acto knife and brush glue all over. The glue will also smoothen out the edges of the cut pages a bit.
It's now time to place those weights back on top of the book and let it dry for as long as you think it would take to dry completely. I waited for 2 hours again for this.


Covering the book with a wrapping paper is, of course, optional. I just want this look for my book safe so when the glue dried, I went on to wrap my book with my chosen design.


As I've mentioned earlier, if you want your safe to be a top secret one and wanted it to look like a normal book, you should have a few pages saved and wrapped with the front cover. Now is the time to let them out of the plastic wrapper. Brush your glue mixture on top of the hollow area which are your borders, so when you close the book, the page before it will adhere to the glued part and will cover the secret compartment. When it's complete dry, carefully cut along the edges to reveal the hollow part.
***The 4 pictures above show the same process described, I just used the blue scrapbook paper instead of one of the saved first few pages of the book since I didn't save any. Adhering one page on top of the hollow area is a way to cover imperfections such as excess glue or the pen lines from outlining the borders.

Do the same with the back cover, remove the plastic wrap and brush on the glue mixture on the borders. Close the book, put some weights, and let it dry.


This one I made is really not that secure, so I don't actually place those valuable items there, I just put them there for the picture, haha. Keeping a book safe looking like a normal book and placing it on a bookshelf is probably a better way to keep valuables, thus serving its purpose as a safe. Mine is just a novelty type one, just a cute gift idea.
Thank you for stopping by. Now, I'm off to making another one. Ciao!
It's now time to place those weights back on top of the book and let it dry for as long as you think it would take to dry completely. I waited for 2 hours again for this.


Covering the book with a wrapping paper is, of course, optional. I just want this look for my book safe so when the glue dried, I went on to wrap my book with my chosen design.


As I've mentioned earlier, if you want your safe to be a top secret one and wanted it to look like a normal book, you should have a few pages saved and wrapped with the front cover. Now is the time to let them out of the plastic wrapper. Brush your glue mixture on top of the hollow area which are your borders, so when you close the book, the page before it will adhere to the glued part and will cover the secret compartment. When it's complete dry, carefully cut along the edges to reveal the hollow part.
***The 4 pictures above show the same process described, I just used the blue scrapbook paper instead of one of the saved first few pages of the book since I didn't save any. Adhering one page on top of the hollow area is a way to cover imperfections such as excess glue or the pen lines from outlining the borders.

Do the same with the back cover, remove the plastic wrap and brush on the glue mixture on the borders. Close the book, put some weights, and let it dry.

Your book safe is now ready. Cute, eh? Go on and stash your treasures inside. Christmas is just around the corner and I think this would be a nice gift for someone special.

This one I made is really not that secure, so I don't actually place those valuable items there, I just put them there for the picture, haha. Keeping a book safe looking like a normal book and placing it on a bookshelf is probably a better way to keep valuables, thus serving its purpose as a safe. Mine is just a novelty type one, just a cute gift idea.
Thank you for stopping by. Now, I'm off to making another one. Ciao!
Oh this is interesting!!! :) Cute!
ReplyDeleteThank you.
DeleteAng galing mommy! You are so creative! :)
ReplyDeleteyou are really good every time I read your blog. Galing
ReplyDeleteWow, thanks a lot!
Deletenifty nifty idea!
ReplyDeleteThanks.
DeleteA book safe is a nice idea though I don't like the idea of destroying a book to make one...
ReplyDeleteHihi, I actually feel guilty about this. That's why I didn't get one from my collection, I bought this from a second hand book shop, something that I think would just go to waste, it's been repriced like 4 times and it's still there so I just put it to good use, haha. This book is about roads, nothing too interesting.
DeleteLovely! I so admire your patience, creativity and talent, and I look forward to visiting your blog to see what other masterpieces you've come up with. -- Maria Teresa Figuerres
ReplyDeleteAww, thank you!
Delete