
.jpg) |
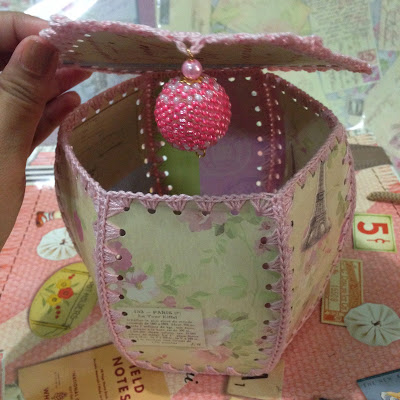
| My trinket box made from recycled card board, scrapbook paper and crochet thread. |

These are just what I can reach right now because they're where I store some of my craft tools and supplies. The other prettier ones are in the bedroom on my vanity table, with the watch boxes I also collect, where I put some of my makeup stuff, the smaller ones. I even save our cereal boxes for future craft projects. Well, I know you get it, I'm a bit of a hoarder when it comes to boxes and other pretty containers. Thus, this project.
To start, pick a shape that you want for your box. I chose hexagon. I thought that the easiest way to get the shape is to get one online and print it, unfortunately, my printer ink cartridge is all dried up, I haven't used it in a while, so I just traced one from my laptop's monitor. I tried it on the iPad first but it kept zooming in and out even with the slightest touch. So, here's what I did.


For those who don't have a printer with you right now or are not good at drawing, this way is really easy. Just place a paper on your monitor, mark the six corners and you're done, you now have the foundation for your hexagon. Then, just connect the dots with your ruler.


Choose a color that would match your scrapbook paper or even a contrasting color, whatever you think would compliment your box.

For this particular size of hole and the distance from the side and between each hole, I made 3 single crochet in each. Try to start from there, three stitches, add one or more single crochet in each hole, whatever is the best fit, just make sure that you make the same number of stitches for all except for the one in the corner. I did 3 single crochets, 1 chain, and another 3 single crochets in the corner hole.

When you're done with crocheting all the parts, it's now assembly time. Using the same crochet thread or yarn, and a needle, stitch the parts together starting with the bottom.


On the lid, I added a simple edging stitch. On the first stitch on one side, make a single crochet.

Chain 3.


To start, pick a shape that you want for your box. I chose hexagon. I thought that the easiest way to get the shape is to get one online and print it, unfortunately, my printer ink cartridge is all dried up, I haven't used it in a while, so I just traced one from my laptop's monitor. I tried it on the iPad first but it kept zooming in and out even with the slightest touch. So, here's what I did.


That hexagon is now the bottom part of your box. For the second part of the box, the six sides, start with measuring the length of one side of the hexagon, that should be the length of the bottom and the top sides of your second part. Now put a little curve on the other two sides, you can make it a bigger curve if you want your box rounder, make sure that both sides are of equal length as well.

You now have your templates. Mark the distance from the sides where you want to punch in the holes. I made it 0.50 cm from the sides, 1 cm distance between each hole and I used a 3mm- puncher. because I was going to use crochet thread. If you're planning to use a thick yarn, use a bigger hole puncher and adjust the distance accordingly.

The third part is the lid. Use the hexagon template and make a bigger one, I made my lid 0.50 cm bigger than the bottom.


This is the card board I used, the cover of one of my paper books. I like that it already has a nice print on one side. The printed side will be the inside of the box. I made the lid and 5 more of the sides from the card board. You can use any cardboard you have on hand. I'll be trying out cereal boxes next.

On your scrapbook paper, draw the shapes using the templates and cut them.

Paste the scrapbook paper on the plain side of the card board. Do this to all the parts. You can use a decoupage medium or just plain white glue. I used white glue and evenly applied it on the surface using a paint brush and smoothened it.

When all the parts are done, it's now time to punch in holes, use the template you made earlier.

These are now the pieces with the holes. It's time to get the hook and crochet thread.


For this particular size of hole and the distance from the side and between each hole, I made 3 single crochet in each. Try to start from there, three stitches, add one or more single crochet in each hole, whatever is the best fit, just make sure that you make the same number of stitches for all except for the one in the corner. I did 3 single crochets, 1 chain, and another 3 single crochets in the corner hole.

When you're done with crocheting all the parts, it's now assembly time. Using the same crochet thread or yarn, and a needle, stitch the parts together starting with the bottom.


Stitch the outer loops together. You can try to stitch both loops and check what you would want. I just find that stitching just the outer loops give a nicer finish. Attach all the parts to the bottom piece first, then stitch the sides together the same way.

On the lid, I added a simple edging stitch. On the first stitch on one side, make a single crochet.

Chain 3.

Double crochet on the next stitch.

Slip stitch on the next.

Repeat (single crochet, chain 3, double crochet on the next stitch, slip stitch on the next) until you finish 5 sides. Leave one side without the edging and attach this side of the lid to the box the same way the other parts are stitched together.


 |
There you have it, a personalized trinket box. I put a big bead to weigh the lid down so it closes nicely.
I've got the idea to make this when I was actually looking for an easy way to make paper mache boxes, card board box organizer, or something else like those, then when I was browsing through the images, (yes, I find it easier to find what exactly I'm looking for when I browse images) some pictures show boxes like this made from greeting cards. What a great way to recycle. If you have lots of old greeting cards you can use and want to check them out, just ask the help of our friend Google and type in "vintage greeting card boxes". Too bad, I don't have any, so as always, I'll just make do with what I have on hand.
You can try different shapes. I'll be making more when I get the time. Someone like me could never have enough boxes.
I hope you like it.
This is really cute!
ReplyDeleteThis is awesome :)
ReplyDeleteOh my goodness gracious you did crochet. This is so stinkin' cute! :D
ReplyDeleteI love to do crochet in most of my works, even on a greeting card. Thank you!
DeleteThis is so awesome! It's so cute! But my problem is even while I was reading it I didn't understand some parts because I don't know how to crochet >,< Last post of yours that I read was about you making your daughter's clothes. And now this. I honestly wish I had your talent!
ReplyDeleteThank you. I guess, I'm also very patient, haha.
DeleteI wish i had the time and the patience to do a cute DIY project such as this vintage trinket box you've made.
ReplyDeleteYou're right, it requires time and patience, haha. Thank you.
DeleteOMG, you're so creative. Its so pretty!!!
ReplyDeleteThank you.
DeleteWhat an excellent job you did on that box! How crafty! Unfortunately, I don't have the talent, ability and patience to do the same. Kudos to you!
ReplyDeletexoxo
MrsMartinez
Why, thank you! =)
DeleteAmazing! I love your creativity mommy and the tip on copying the shape from the screen, how come I never thought of that! haha Your tutorial is very easy to follow, except for the crochet part as I don't know how to do it! Will try to do this when I have the chance.. maybe I could just stitch them differently instead of crochet.. hehe
ReplyDeletePS: I would love to read a crochet tutorial next time! :)
Thank you. I guess I learned to be resourceful also, haha.
DeleteYour really good how I wish I can do that
ReplyDeleteThank you!
DeleteThis is so cute. How I wish I know how to crochet. Huhu
ReplyDeleteThank you. This can also be done using blanket stitch, just using our usual needle and thread for sewing.
DeleteAy ang galing mo! I love your craft, super! idol na kita :-)
ReplyDeleteWow, thank you, haha.
DeleteWhat a fabulous creative idea. Love it x
ReplyDeleteZeer mooi, ik zou graag de grote weten van de zeshoek
ReplyDeleteGrt
Love this - thank you!
ReplyDelete